.png)
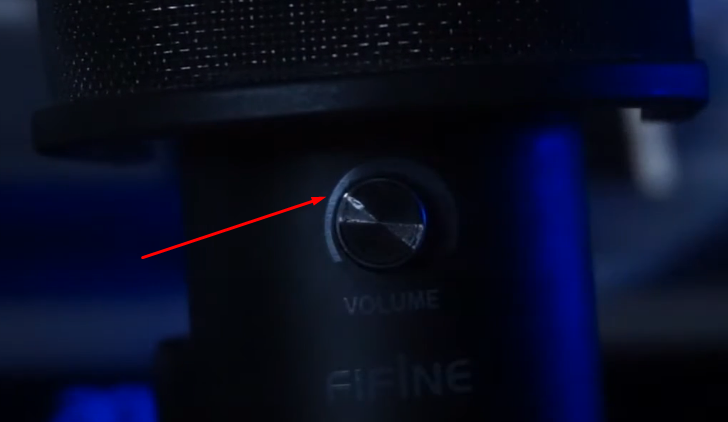
Fifine microphones are great for beginners and budget-friendly too. They’re cheap but still give a clear and sharp sound. Voices come out clean with little background noise. The audio quality is best for talking and casual content. They may not be studio-level, but they do the job well. Some versions come with touch mute buttons and headphone ports. A few also have cool RGB lights that glow while in use.
This article will show you how to set up Fifine microphone on different devices. You’ll learn how to connect it to laptops, cameras, phones, and streaming apps. Multiple Fifine mics are demonstrated in this guide. That makes each step easier to follow and understand.
How to Set Up a Fifine Microphone on Various Devices?
In this section, you will learn the methods to connect the popular Fifine microphone models to your Mac and Windows computer, DSLR camera, PS5, OBS, and iPhone.
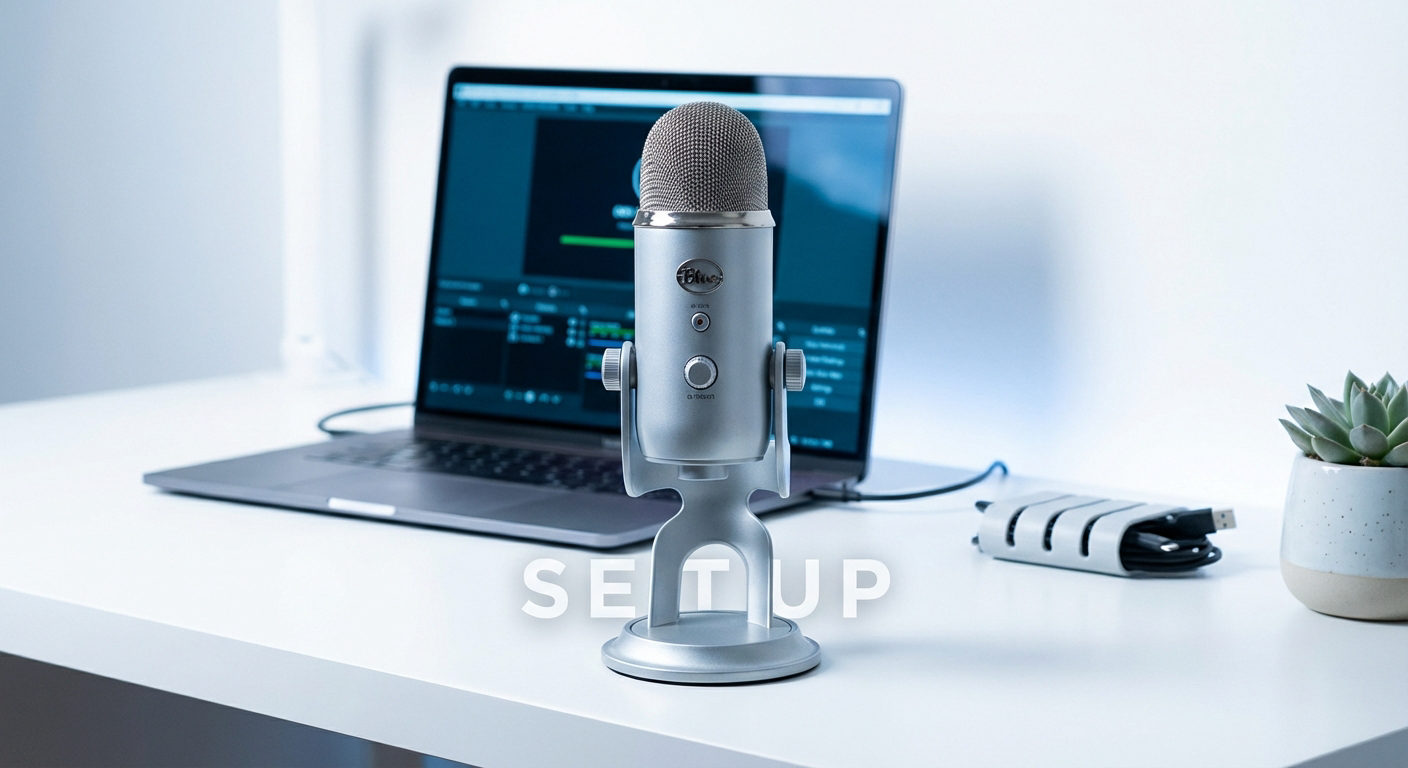
Setting Up Fifine AmpliGame USB Mic on a Mac and Windows Computer
This tutorial is divided into three sections. The first segment shows you assembling the microphone components. The next two segments guide you through configuring the Fifine AmpliGame microphone on your Mac or Windows system.
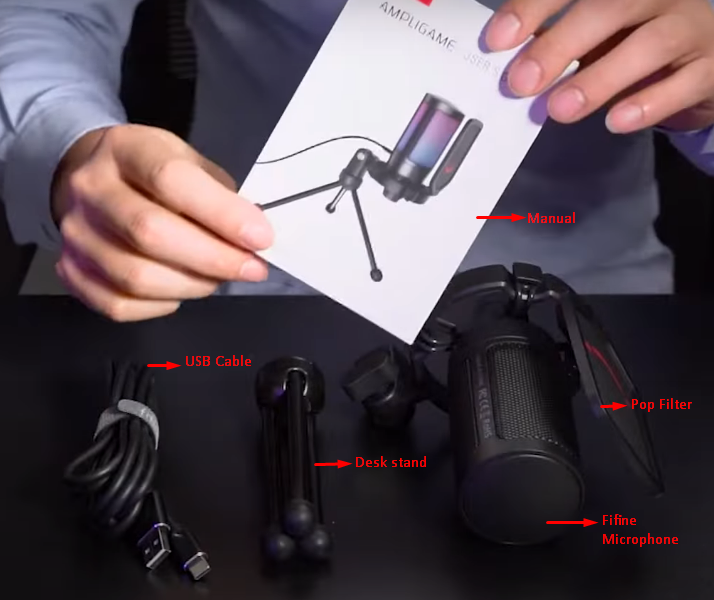
Assembling Fifine AmpliGame Microphone
- Step 1: Unbox the microphone
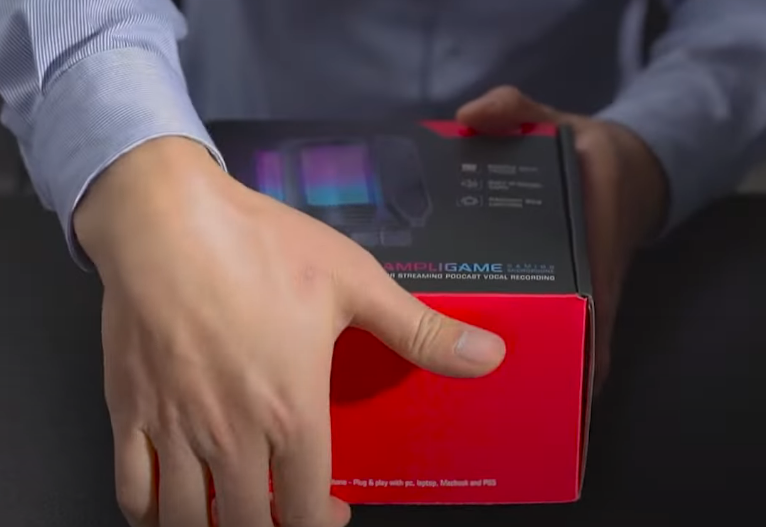
Inside the box, you should find a microphone with a detachable desk stand, a USB cable, and a product manual
- Step 2: Attach the stand at the bottom of the mic
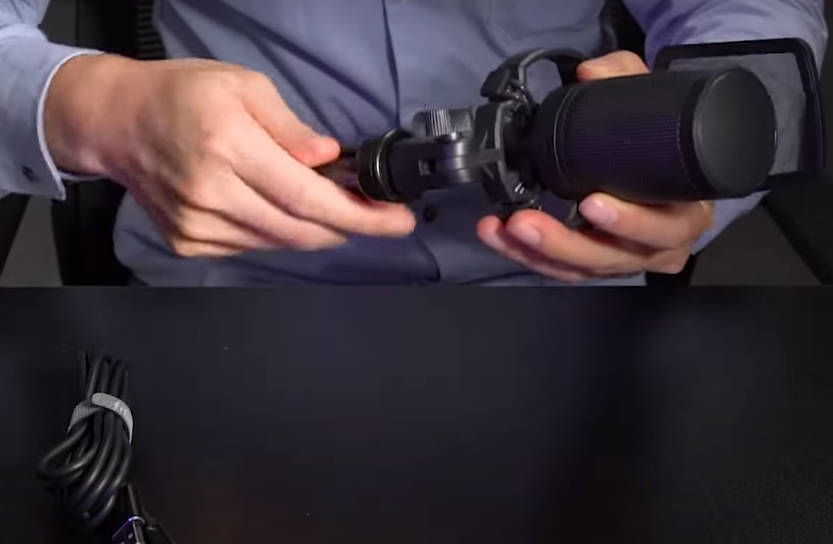
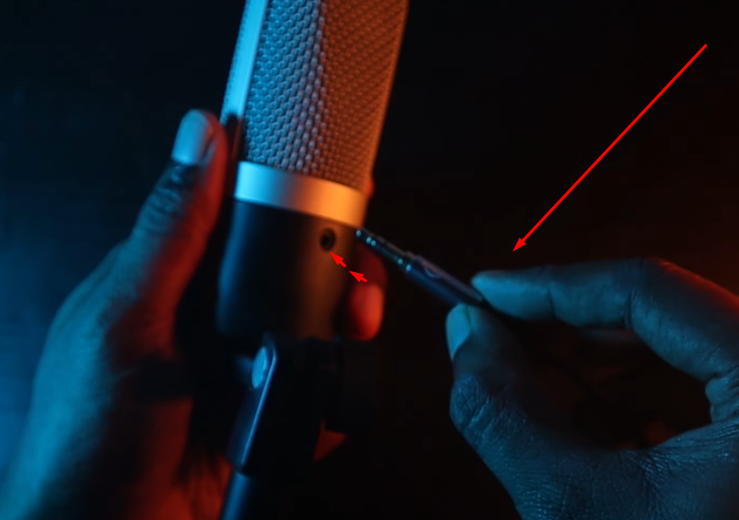
- Step 3: Insert the USB-C plug into the microphone
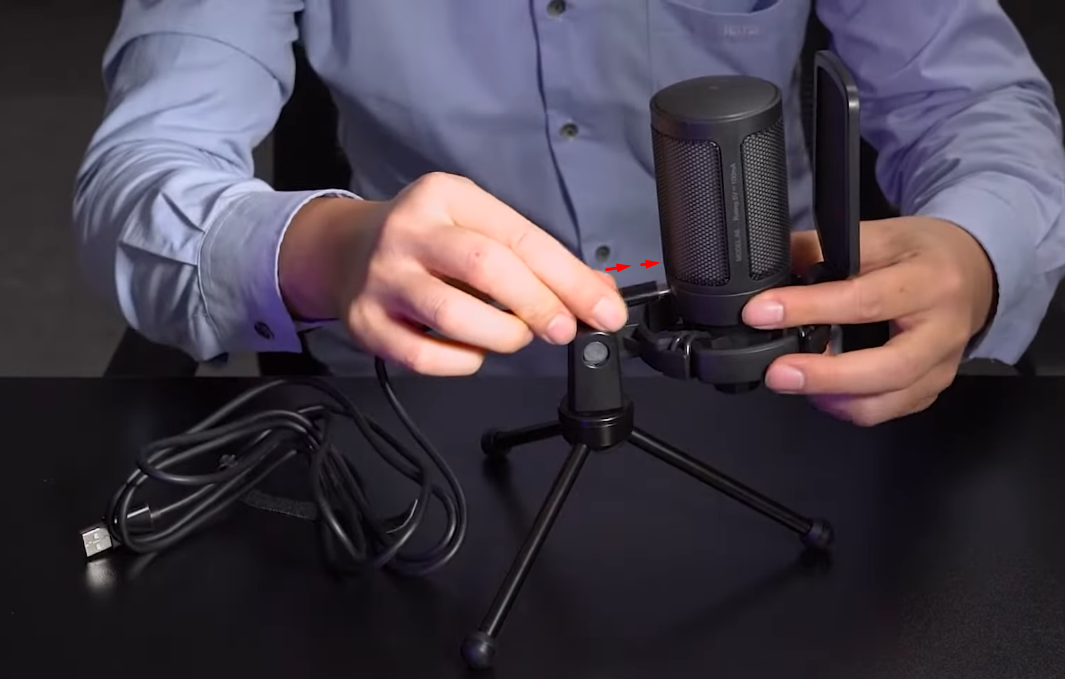
- Step 4: Then, insert the other end of the USB cable into your Mac or Windows USB port
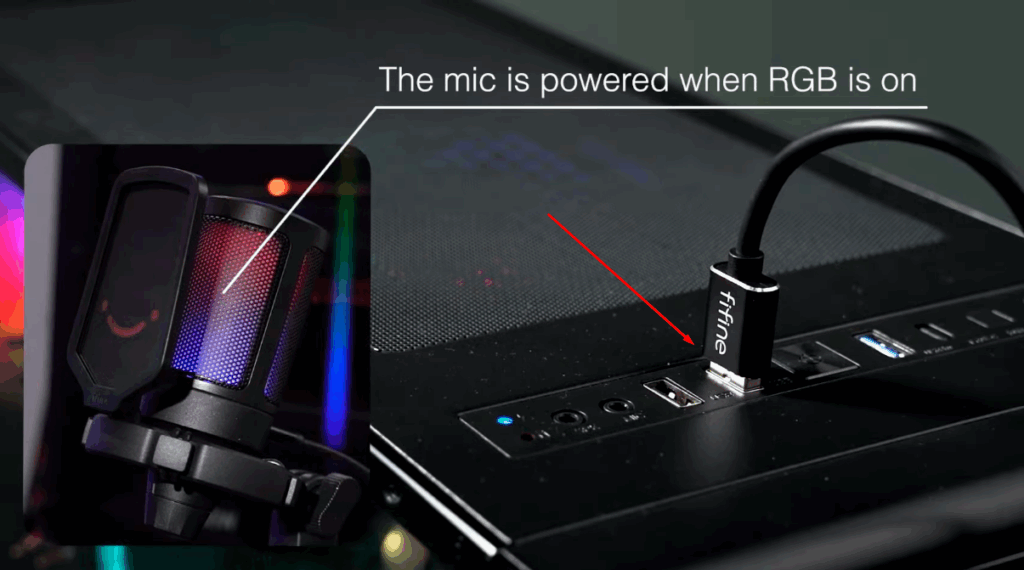
NOTE: You may need an adapter to connect to your computer.
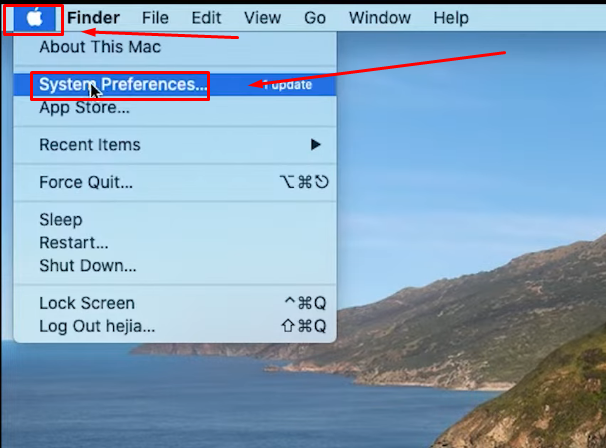
Configuring Fifine AmpliGame on a Mac
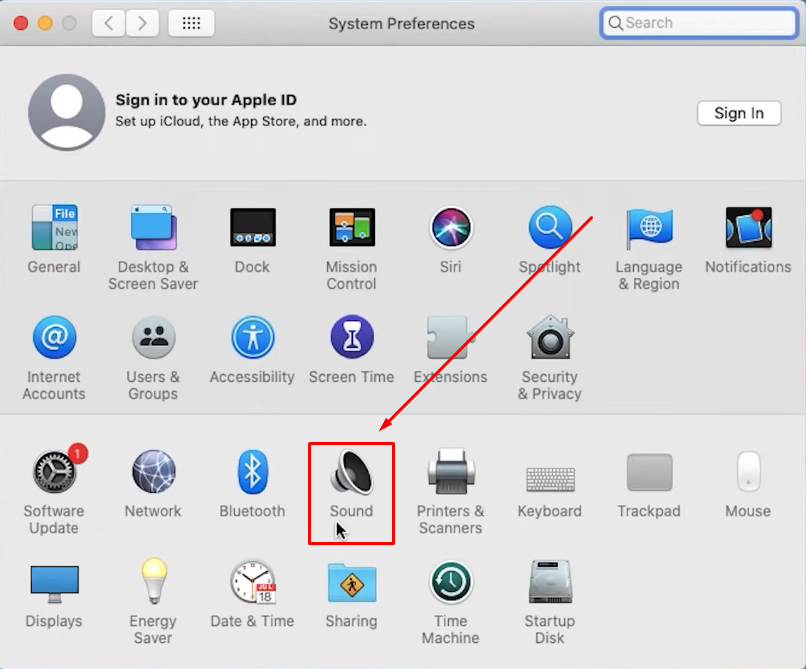
- Step 1: On your Mac, click on the “Apple menu” icon on the top-left corner of the screen and choose “System Preferences…” (“System Settings…” on new Mac versions)
- Step 2: On the System Preferences window, look for the “Sound” option (speaker icon) and click on it
- Step 3: On the “Sound” settings page, select the “Input” tab from the top area
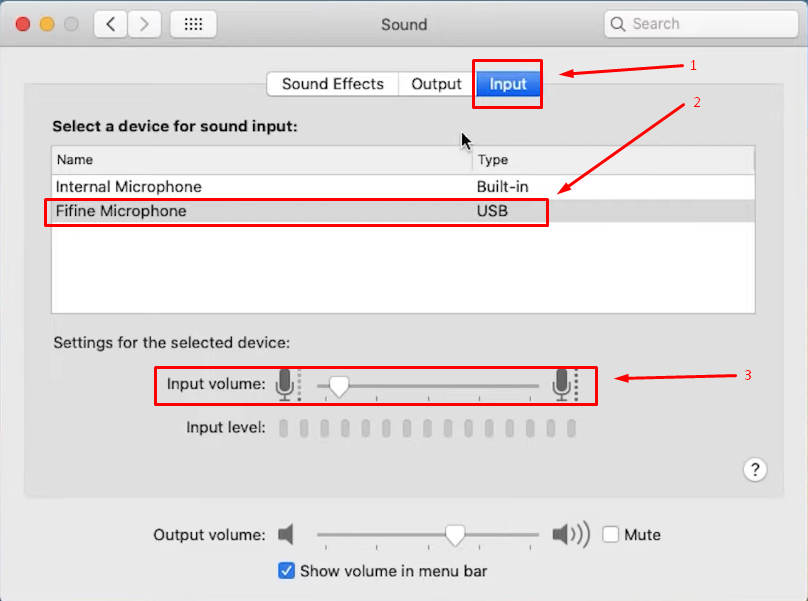
Under the “Select a device for sound input” section, you should see the “Fifine Microphone” name and type (USB). Click once on the mic’s name to highlight/select it.
Now, go to the “Input volume” bar and adjust the level according to your preference. If you’re not sure, leave this option at its default adjustment.
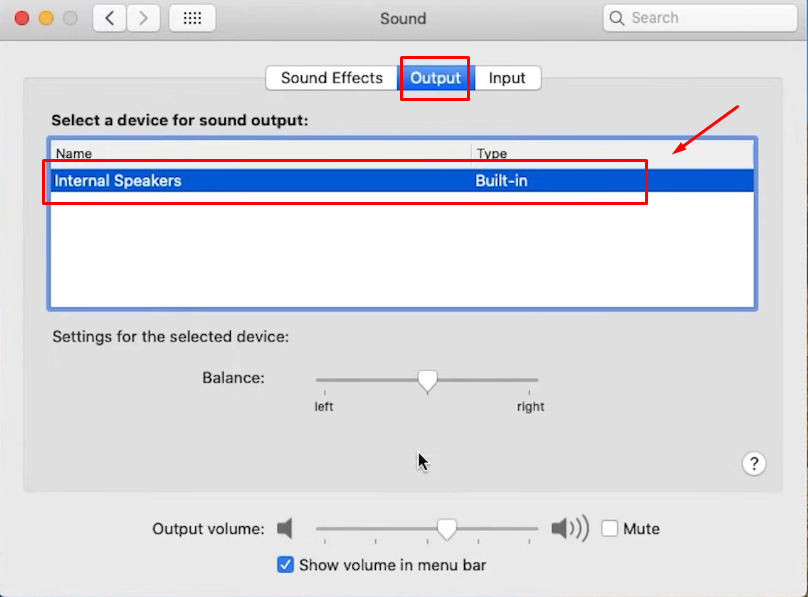
- Step 4: Click on the “Output” tab and check if the audio output device is correctly selected. It could be the internal speakers of your Mac or external headphones
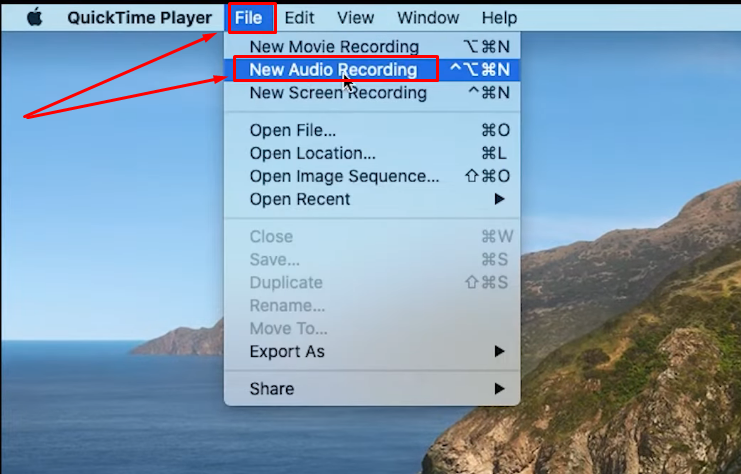
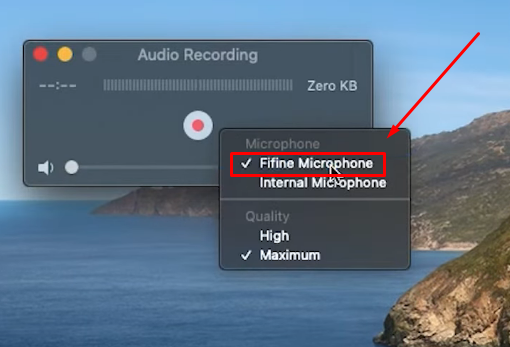
- Step 5: To ensure the audio input device is set to Fifine AmpliGame mic, open the QuickTime Player

- Step 6: Click on the “File” tab from the “QuickTime Player” menu at the top, and select “New Audio Recording”
- Step 7: Click on the input option on the QuickTime Player. If you see “Fifine Microphone” in the list, it means you have successfully set it up on your Mac
Configuring Fifine AmpliGame on a Windows PC
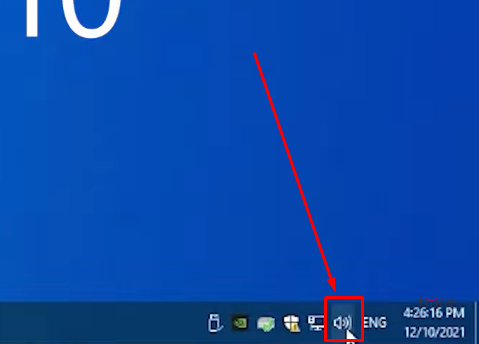
- Step 1: Right-click on the “Sound” option in the bottom-right corner of the taskbar, and select “Open Sound settings”
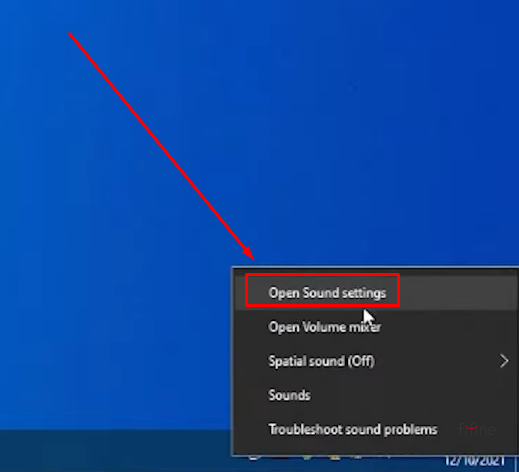
- Step 2: Click on the “Sound Control Panel” option
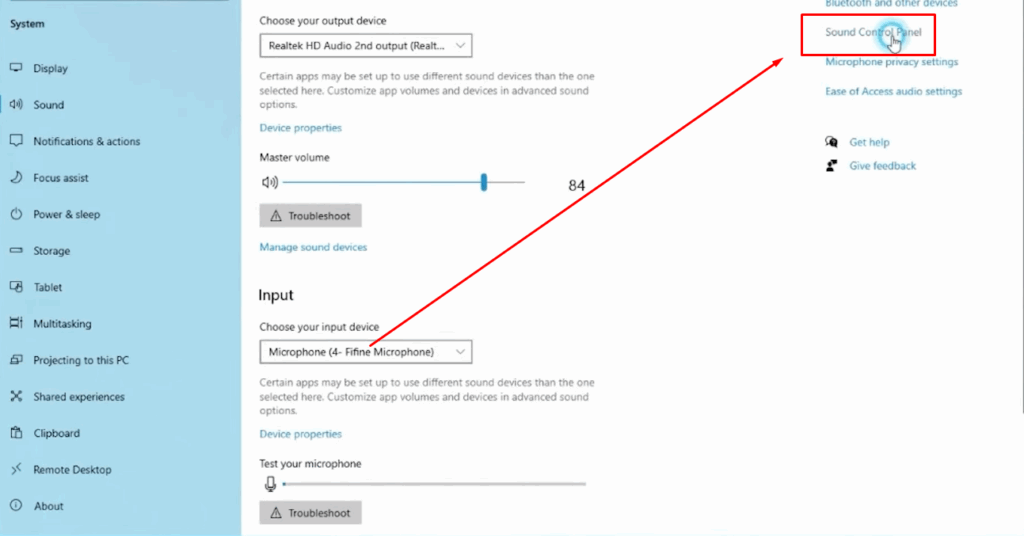
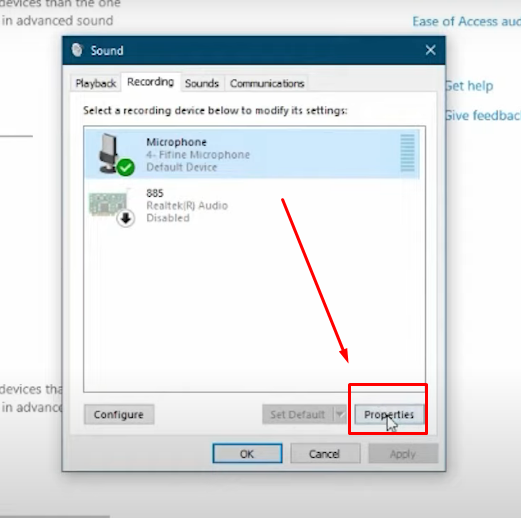
- Step 3: When the “Sound Control Panel” windows pop up, click on the “Recording” tab

Now, under the “Select a recording device below to mofity its settings” section, check if your Fifine microphone is connected.
Click on the microphone once, and click the “Set Default” button to make Fifine AmpliGame your default microphone.
- Step 4: Once done, click on the “Properties” button
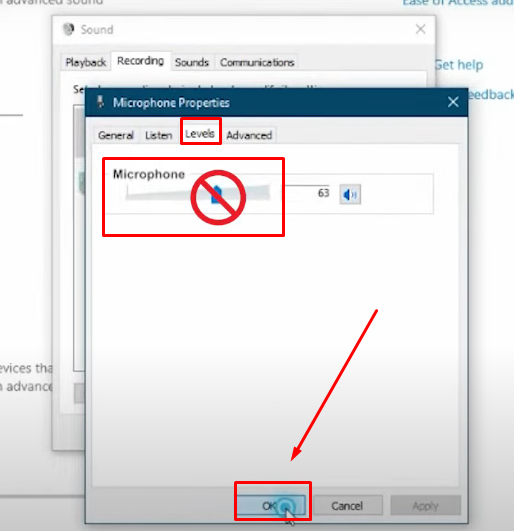
- Step 5: Click on the “Levels” tab and make sure the microphone levels are not too low. If the slider is set to 60%, leave the option to default and click on the “OK” button
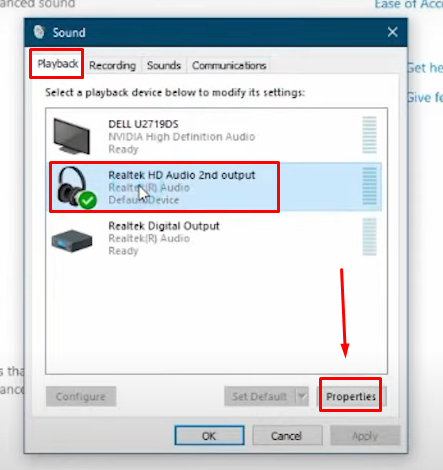
- Step 6: Go back to the “Sound Control Panel” window, select the “Playback” tab from the top menu. Then, select your default audio output device, such as a headset, and click on the “Properties” button
- Step 7: In the audio output properties, click on the “Levels” tab. Grab the slider to adjust the output volume and click the “OK” button
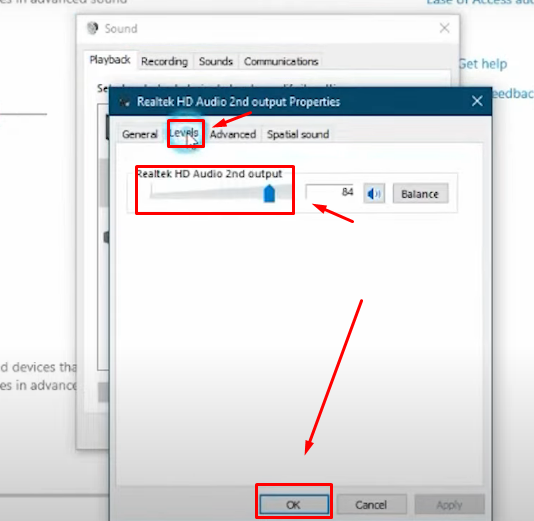
You can also leave this option to default if the output levels are set to your desired percentage.
And you’re good to go!
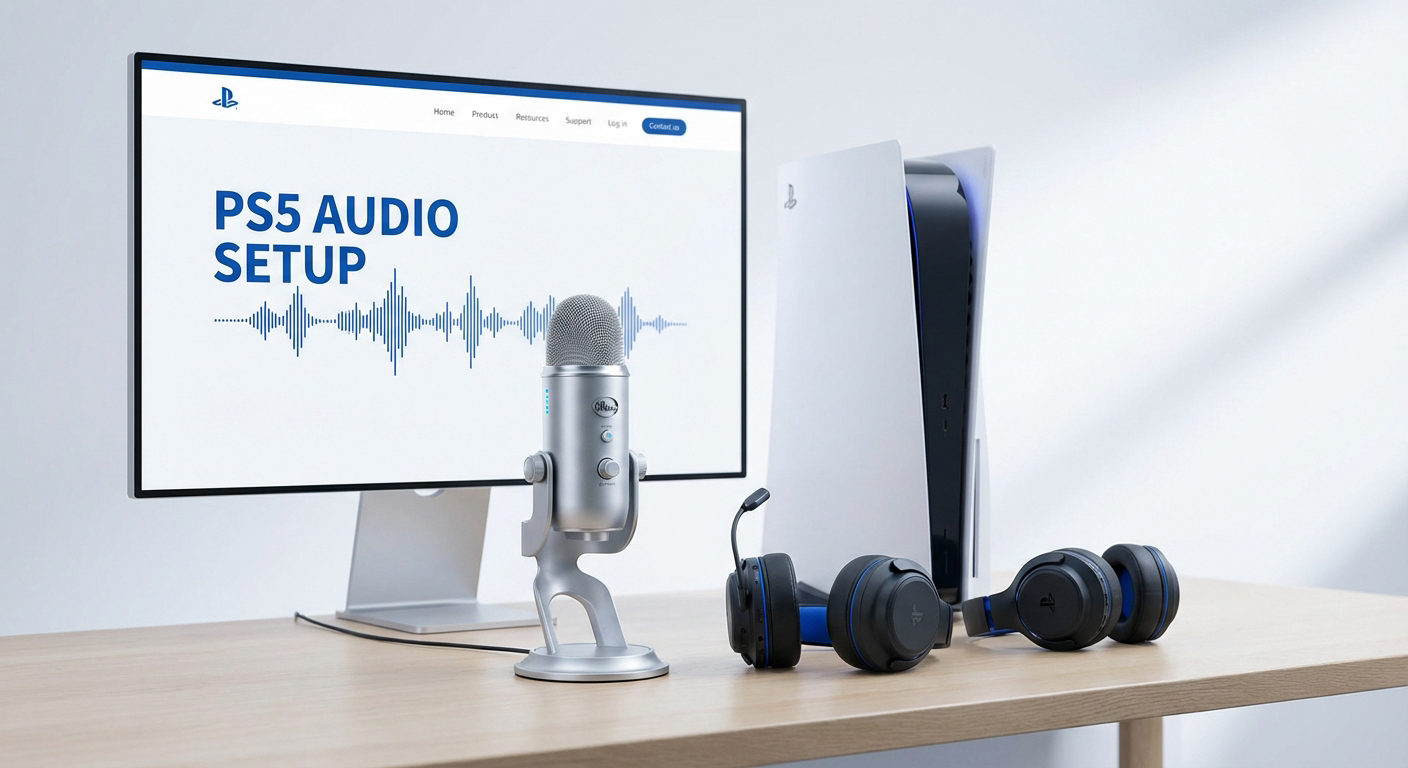
Setting Up Fifine AmpliGame on PS5
It is a straightforward process to set up AmpliGame on your PlayStation 5:
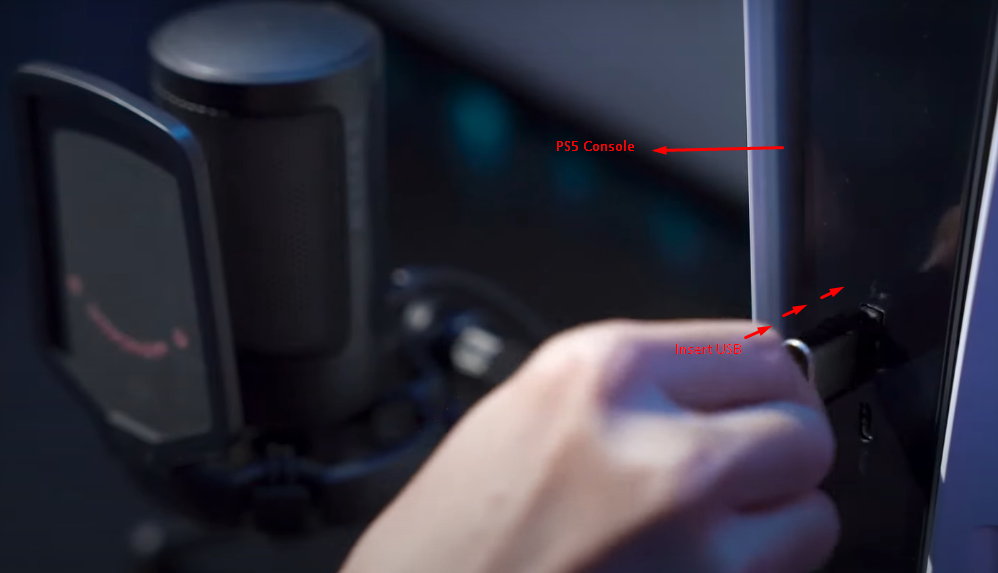
- Step 1: Connect one end of the USB cable to your Fifine mic and the other end of the cable to your PS5’s USB port
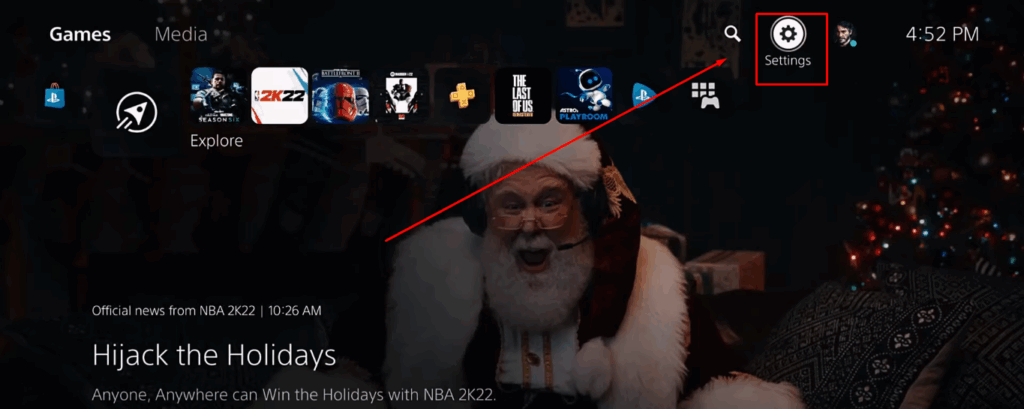
- Step 2: Go to your PS5’s home screen. Go to the “Settings” option (a gear icon) on the top-right side of the screen, and press “X” on the controller to select it
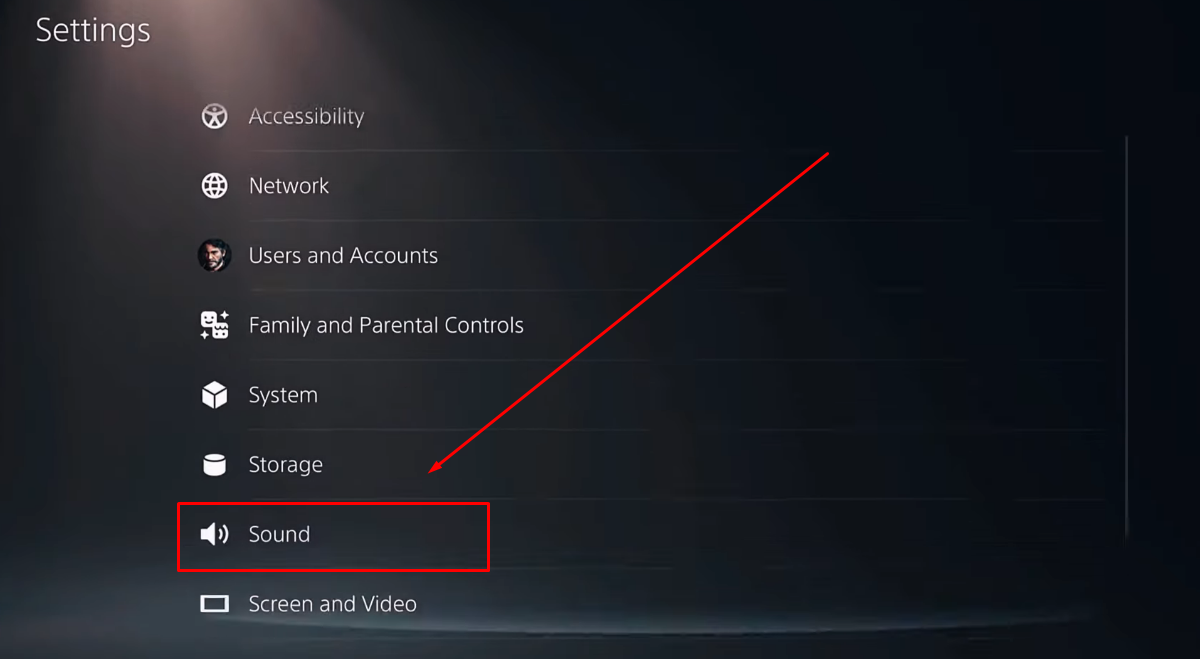
- Step 3: On the “Settings” page, scroll down to the “Sound” option and press “X” to select it
- Step 4: Go to the “Microphone” tab on the left side of the screen, and select the “Input Device” option
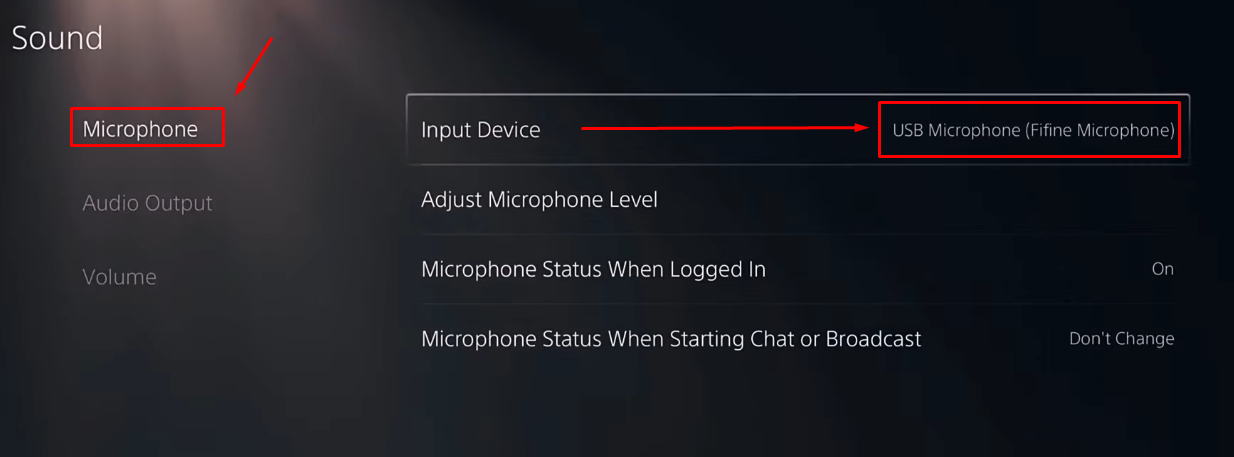
- Step 5: Make sure the “Fifine Microphone” is selected (represented with a checkmark before the name) as your audio input device
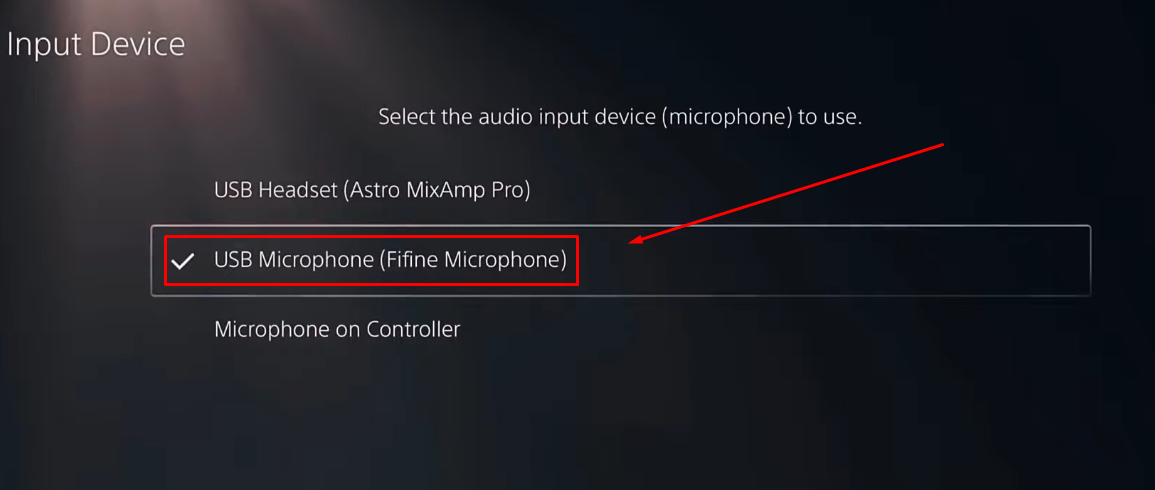
And you’re ready to enjoy chatting with Fifine AmpliGame microphone on your PS5.
Setting Up Fifine K670 on a DSLR Camera
To connect Fifine K670 to your DSLR, you need the following things:
- Microphone itself
- Male to Male 3.5mm TRS cable
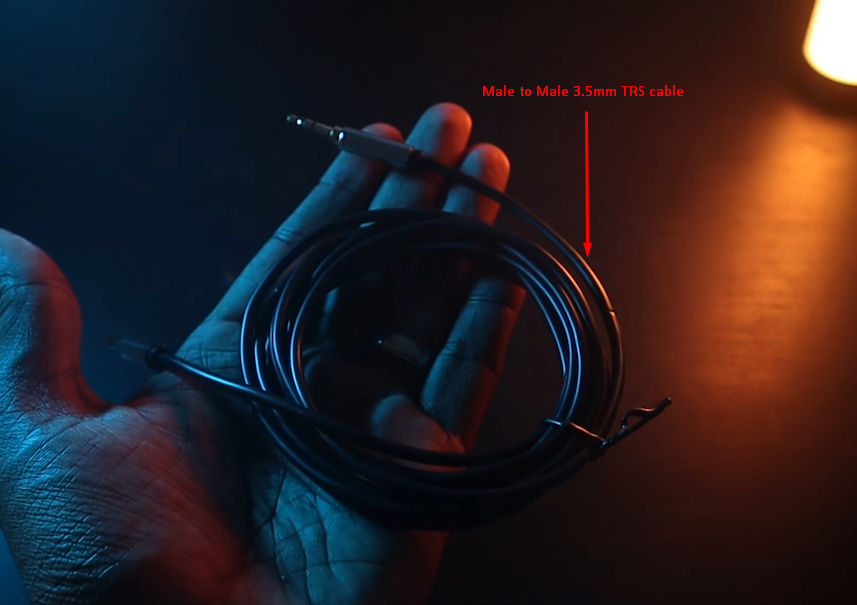
- A computer or laptop to supply power to the microphone
Here are the setup instructions:
- Step 1: Insert one end of the 3.5mm male-to-male TRS cable into the audio port of the microphone
- Step 2: Insert the other end of the TRS cable into the audio port of your camera
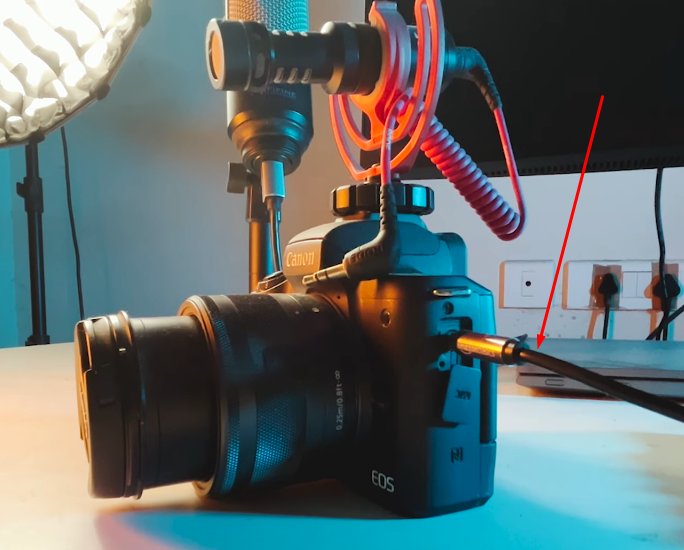
- Step 3: Then, insert the USB connector into your computer’s USB port
- Step 4: Plug the other USB connector into your microphone’s USB port
Once you turn on your computer, the mic will start working. Remember, in this entire process, your PC will just play the role of powering on the microphone, and the voice will be recorded on your DSLR.
Setting Up Fifine K669 on OBS
- Step 1: After connecting the Fifine mic to your computer, increase the microphone gain to 25% to 35%
Do not set the gain high to avoid background noise from being captured in your mic.
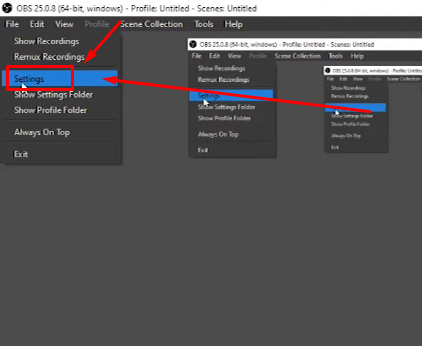
- Step 2: Open OBS, click on the “File” tab, and select “Settings”
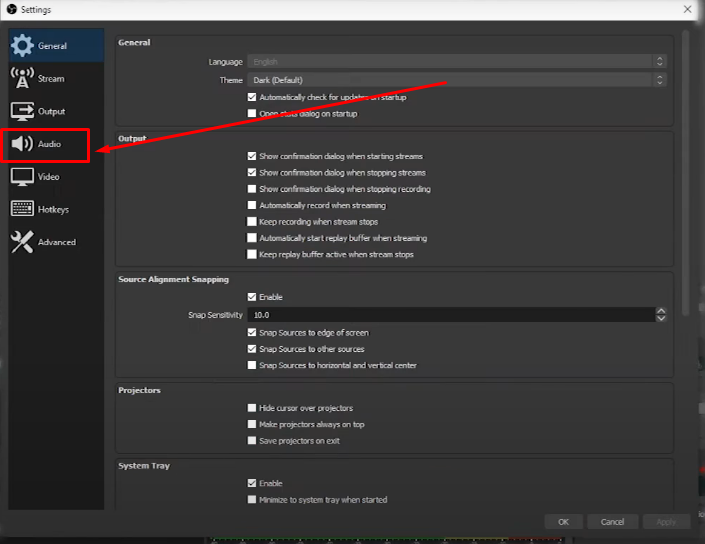
- Step 3: To make sure OBS recognizes your mic, choose the “Audio” tab from the left sidebar
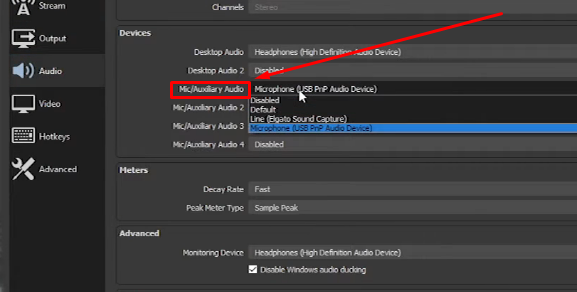
- Step 4: Now, under the “Devices” section on the right side of the screen, go to the “Mic/Audxilary Audio” option, click on the dropdown menu, and select your Fifine microphone (it may appear as a USB microphone)
- Step 5: Jump to the “Audio Mixer” on your OBS screen, and decrease the “Desktop Audio” levels to -20 dB
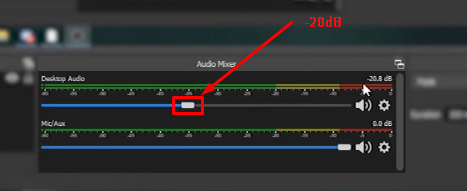
This ensures the game volume does not overshadow the microphone volume, in case you stream games.
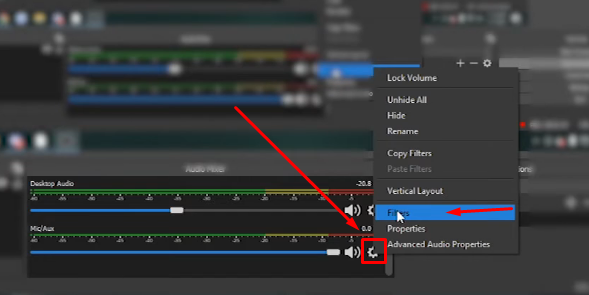
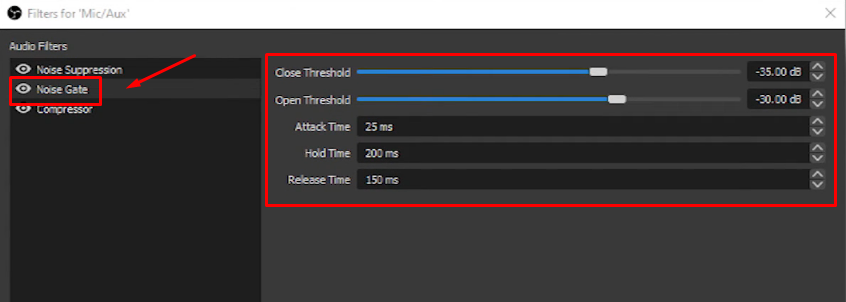
- Step 6: Next, go to the “Mic/Aux” section on the audio mixer, click the “gear icon,” and select “Filters”
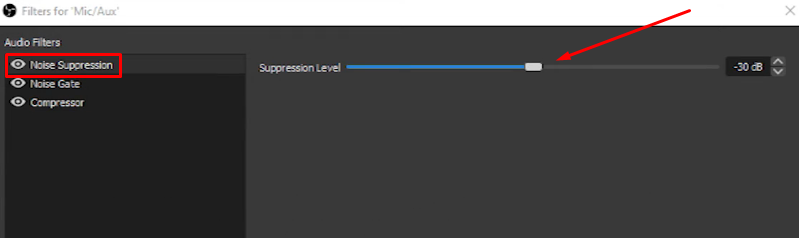
- Step 7: Then, right-click on the “Filters” window, go to the “Add” option to include three important filters – Noise Suppression, Noise Gate, and Compressor
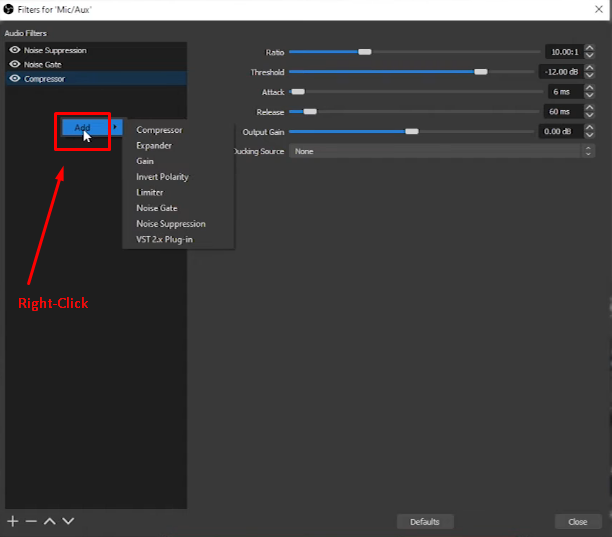
- Step 8: Adjust levels for each filter according to the audio quality you are experiencing
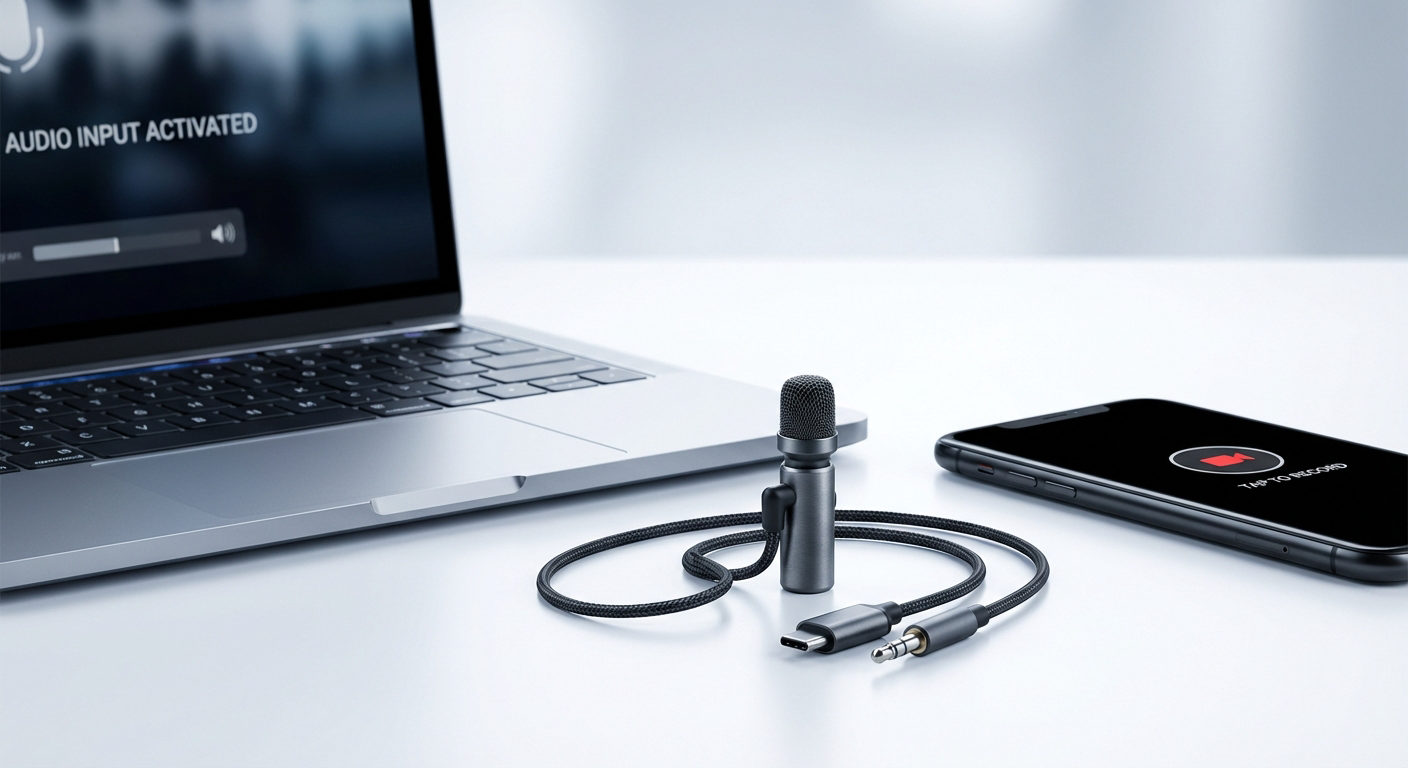
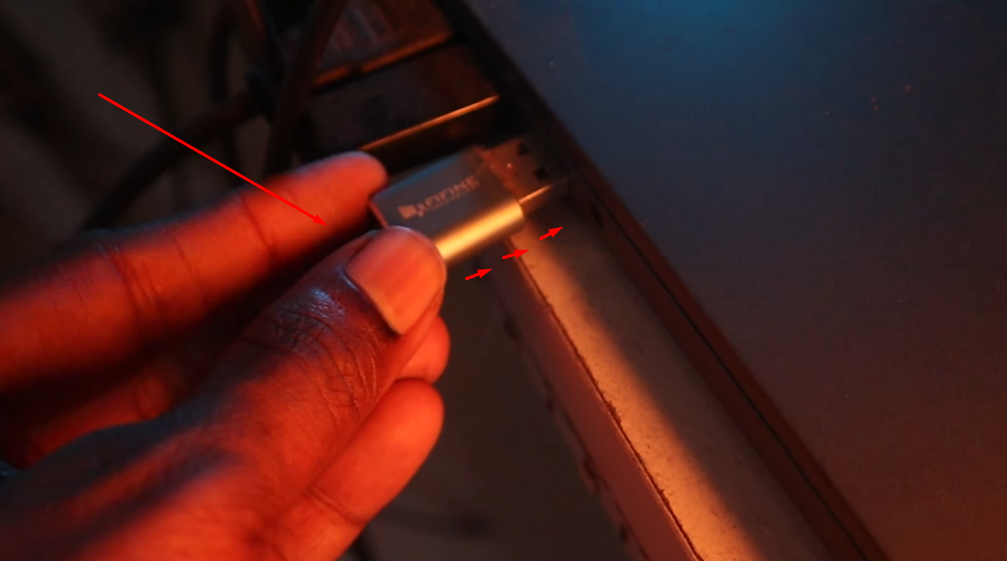
Setting Up Fifine K678 on iPhone
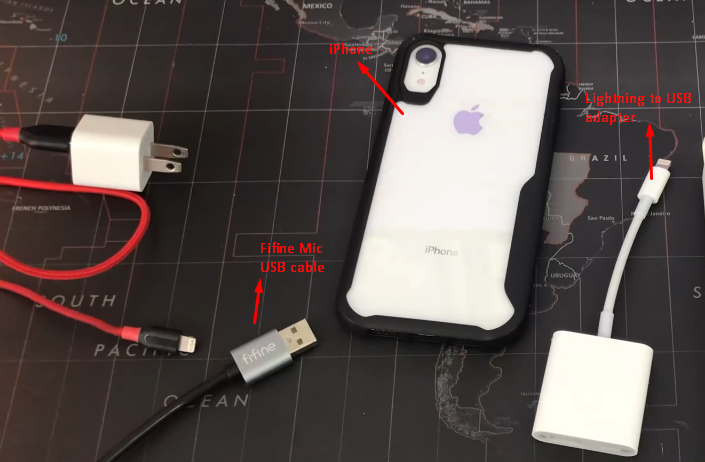
- Step 1: Connect your Fifine mic to the Lightning/USB-C to USB adapter
- Step 2: Plug the adapter into your iPhone’s USB-C/Lightning port
- Step 3: Open the camera or voice recording app to start using the mic
That’s the fastest of all setups!
NOTE: The same steps should work for setting up a FIfine microphone on your Android phone.
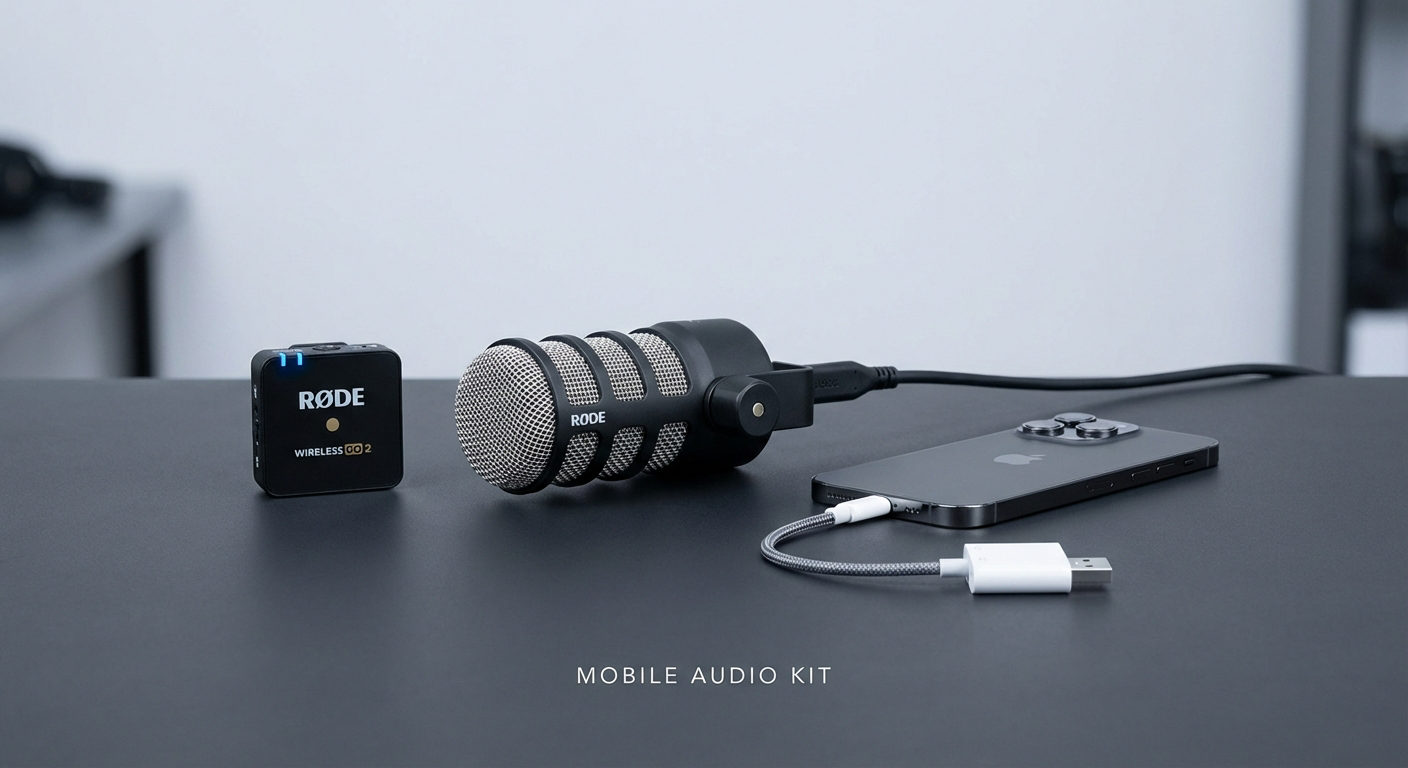
Pro Tip: While Fifine microphones are quick to set up, you may still be tangled in wires, especially if you love your freedom of movement! On the other hand, a wireless microphone like the Hollyland Lark M2S can make you unstoppable in your content creation and livestreaming journey!

Hollyland LARK M2S - Wireless Hidden Microphone
An ultra-discreet wireless microphone featuring a clip-on transmitter for an “invisible” fit.
Key Features: No-Logo Fit | Ti+ Design | 48 kHz/24-bit
Imagine a 7-gram tiny microphone attached to your collar through a titanium clip-on grip. Its logo-free design gives you an actual feeling of being free. That’s how Lark M2S is!
Moreover, this wireless lavalier microphone offers a transmission range of up to 1000ft. Thanks to its long battery life of up to 9 hours, you can roam around and record a full day of audio without a hitch. And while you record a vlog on a busy street, in a mountainous environment, or inside a fully isolated studio, its dual-level Environmental Noise Cancellation (ENC) feature always keeps noises away from the audio
Conclusion
Before using the mic, it helps to learn the basics. You need to know how to set up Fifine microphone the right way. Most devices that accept USB will work just fine. That includes laptops, tablets, and even gaming consoles. Phones and DSLR cameras might need an extra adapter. Once connected, the rest is usually quick and simple.
But setup isn’t always just plug and play. The mic must be detected by the system first. So you may need to adjust the input settings manually. Both Mac and Windows allow this in their sound settings. If you stream with OBS Studio, it needs setup too. These small tweaks make sure everything runs smoothly.
Frequently Asked Questions about Setting Up a Fifine Microphone
Q1: Does a Fifine microphone need any software to work?
Fifine microphones don’t come with their own software. There’s no need to download any drivers either. These USB mics work straight out of the box. They use the built-in system drivers found in Windows, Mac, some Linux systems, and even Chromebooks. That means setup is easy and quick. You just plug the mic in, and the system handles the rest. No extra tools or apps are needed for it to function properly.
Q2: How can someone use a Fifine mic for voice recognition?
On a Windows system, go to the sound settings first. Set the Fifine mic as your main input device. Then open Settings and find the Time and Language tab. Click on Voice and start the wizard. Follow each step to complete the setup. Then, test the mic. For Mac, open System Preferences and select Keyboard. Go to the Dictation tab. Enable it, pick your language, and choose the Fifine mic. Set a shortcut key for quick voice activation.
Q3: What can improve Fifine mic quality in OBS Studio?
To get better sound in OBS, start with the gain control. Turn up the mic volume if your voice sounds low. Next, use noise suppression to cut out background noise. A limiter can help stop sudden loud sounds from distorting. The equalizer boosts sound quality based on your voice. Also, apply a compressor to smooth out volume changes. These settings work together to clean and balance your audio for better streaming and recording sessions.
Q4: Is the Fifine K669 a good microphone to buy?
The K669 mic is decent for basic use. It picks up lots of background noise, like echoes or fans. You might need to record in a quiet space or even a closet. The sound it captures can feel a bit thin. It was compared to the Snowball mic and gave similar results. In short, no gigantic differences between these two. Therefore, anyone on a tight budget can opt for the Fifine K669.
Q5: Which is better – a USB mic or a wireless lavalier mic?
For content creators, wireless lavalier mics are often better. They are easier to carry and don’t need to stay plugged in. Their small size makes them less noticeable during shoots. USB mics work well at desks but aren’t portable. Lavalier mics also look more professional in videos. If you’re always moving or filming on location, wireless is more convenient. For studio setups, a USB mic might still be a solid pick.