



































.png)
 简体中文
简体中文 
Does your mic sound like you’re recording inside a bathroom? That hollow, roomy sound usually comes from echo or room reverb. But guess what! You can fix many echo problems without spending much money. Some fixes cost nothing and can change your recordings right away. Others rely on software to clean recordings after they’re made. This guide covers seven proven fixes, starting with simple room changes. Keep reading to find which fix suits your recording setup.
Why Does Your Mic Sound Echoey in the First Place?
Every word you speak reflects off hard surfaces around you. Bare walls, wooden floors, windows, and ceilings can all cause reflections. The microphone captures both your direct voice and those delayed reflections, producing the hollow, roomy quality you’re hearing. This is room reverb, and it’s the primary cause of echoey mic audio.
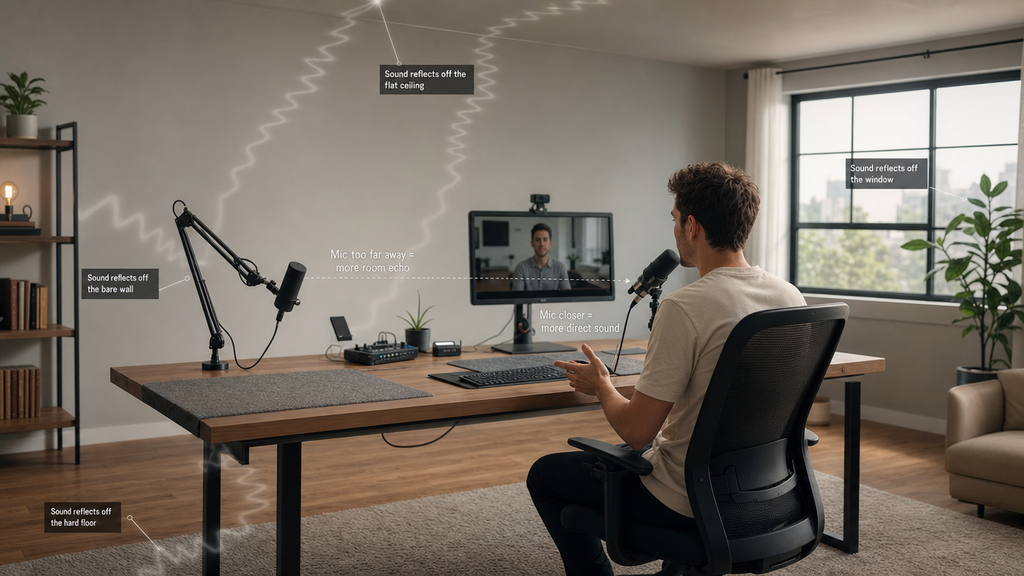
The second cause is distance. The farther the mic sits from your mouth, the higher the ratio of room sound to direct voice. A mic positioned two feet away captures far more reflected room noise than actual voice.
Condenser microphones amplify this issue because of their high sensitivity. They pick up your voice, reflections off the wall behind you, and everything in between. Dynamic microphones are considerably less sensitive and reject more ambient room noise by design. The fixes below address both causes directly.
Treat Your Recording Space First (Highest Impact Fix)
Room treatment eliminates the source of the echo rather than working around it.
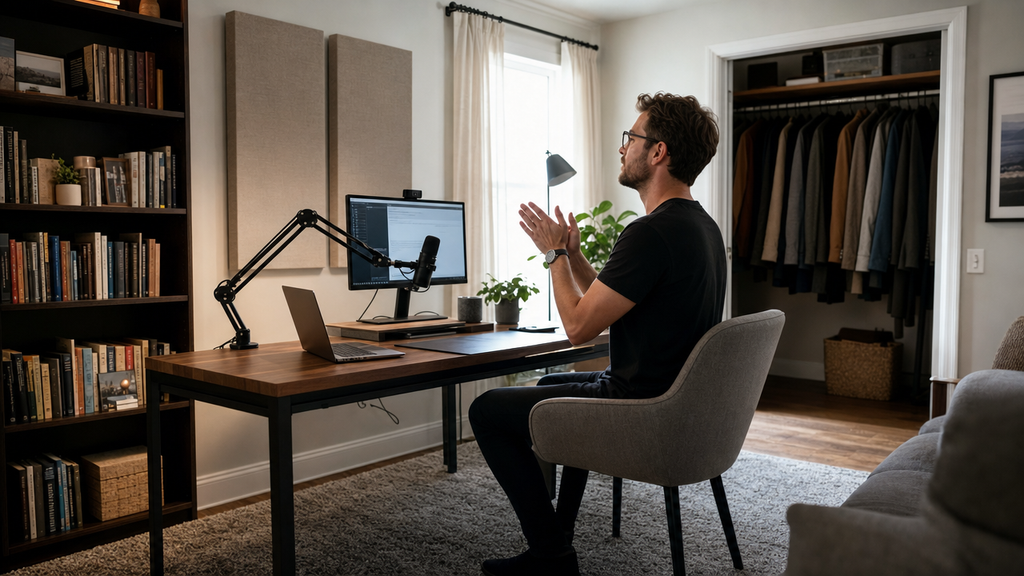
Run the clap test first. Clap once sharply in the center of your room and listen closely. If you hear a short ring, flutter, or springy decay after the clap, your room is significantly reflective, and that’s what your mic captures every time you record.
Here are the specific fixes in order of cost, starting with free:
- Record in a closet full of clothes. A wardrobe packed with hanging garments is one of the most effective natural sound traps available. The irregular, soft surfaces break up reflections from every direction. Many professional voice-over artists rely on this trick routinely.
- Add a large area rug. Hard floors are major reflection sources. A thick rug under and around your recording area absorbs floor bounce and reduces overall room reverb noticeably.
- Rearrange your furniture. Bookshelves filled with books, upholstered chairs, and sofas all act as natural sound diffusers and absorbers. Point your recording setup toward a bookshelf or a corner filled with soft furnishings rather than toward a bare wall.
- Hang moving blankets or heavy curtains. Thick blankets fixed to the wall behind and beside your mic absorb early reflections cheaply and effectively. Moving blankets from a hardware store (typically under $20 each) work just as well as purpose-built acoustic blankets.
- Install foam acoustic panels. Acoustic foam panels (usually $30 to $80 for a starter pack) mounted on walls directly behind and beside your mic position reduce mid-to-high frequency reflections significantly.
- Add bass traps in corners. Low-frequency room buildup collects in corners. Bass traps placed floor-to-ceiling in at least two corners reduce the deep, boomy resonance that makes voices sound distant and muddy.
Note: You don’t need to treat the room. Focus treatment on surfaces within about six feet of the microphone. That’s where the most damaging early reflections originate.
Get the Mic Closer to Your Mouth
Room treatment addresses your environment. Mic placement addresses what the mic actually hears. Both matter, but placement costs nothing and takes seconds to adjust.
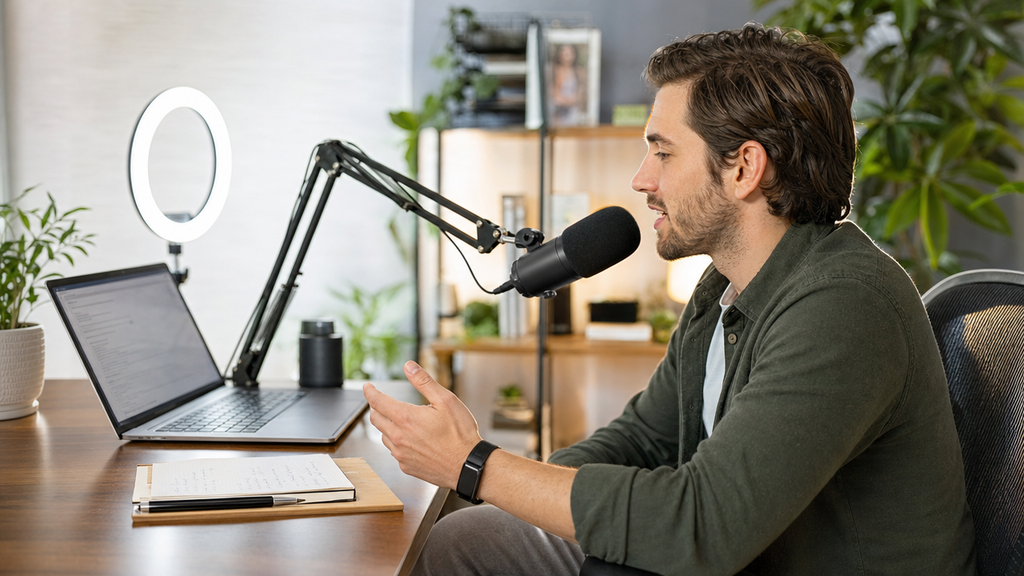
The closer the mic is to your mouth, the higher the ratio of direct voice to room sound. A mic six inches from your mouth captures a strong, clean signal with minimal room noise in the background. A mic two feet away captures a weak direct signal mixed with a much larger proportion of reflected room noise.
Practical placement guidance:
- Target 6 to 12 inches (15 to 30 cm) between your mouth and the mic capsule. This is the effective working range for most desktop condensers and dynamic broadcast mics.
- Use a boom arm or adjustable mic stand. A mic sitting flat on a desk is almost always too far away and pointed at the wrong angle. A boom arm lets you pull the mic close and position it at mouth level, just below or slightly to the side of your face.
- Watch for desk reflections. A flat, hard desk surface reflects sound back up into the mic capsule from below. Angle the mic slightly away from the desk surface, or place a thick foam pad or folded towel on the desk in front of you to break up that reflection path.
Pro Tip: If moving the mic noticeably closer to your mouth feels like a significant change, that’s a sign your current distance was already too far. Most people are surprised at how much improvement this single adjustment delivers on its own.
Use the Right Microphone Type and Polar Pattern
Once the room and mic placement are set, focus on the microphone. The mic type and polar pattern can both affect echo levels.

Dynamic vs. condenser microphones
Condenser mics are highly sensitive and capture a wide frequency range, including distant room reflections. That sensitivity is an asset in a treated studio and a liability in an untreated home.

Dynamic microphones use a different transducer design that requires a sound source to be relatively close and direct to register clearly, so they naturally reject soft ambient sounds like room reflections. If you’re currently using a condenser in an untreated space, switching to a dynamic model may resolve a large portion of your echo problem immediately.

Polar patterns at a glance:
- Cardioid: Captures sound in front and rejects sound from the rear and sides. The best default choice for echoey rooms.
- Hypercardioid: Even tighter front pickup, rejecting more room sound overall, but requires more precise positioning due to a small rear lobe.
- Omnidirectional: Picks up sound equally from all directions. Avoid this pattern in any room with reflective surfaces.
Wireless lavalier mics as a practical alternative
Clip-on lavalier microphones solve the distance problem by design. Because they clip to your collar or lapel, they stay just a few inches from your mouth no matter how you move, dramatically reducing room pickup compared to any desktop mic setup. The Hollyland LARK MAX 2 is a wireless lavalier system that adds AI Noise Cancellation and 48 kHz/32-bit Float recording, making it a strong option for creators who regularly record or film in untreated spaces. For beginners or students on a tighter budget, the Hollyland LARK A1 offers 3-Level Intelligent Noise Cancellation in a compact, plug-and-play format.
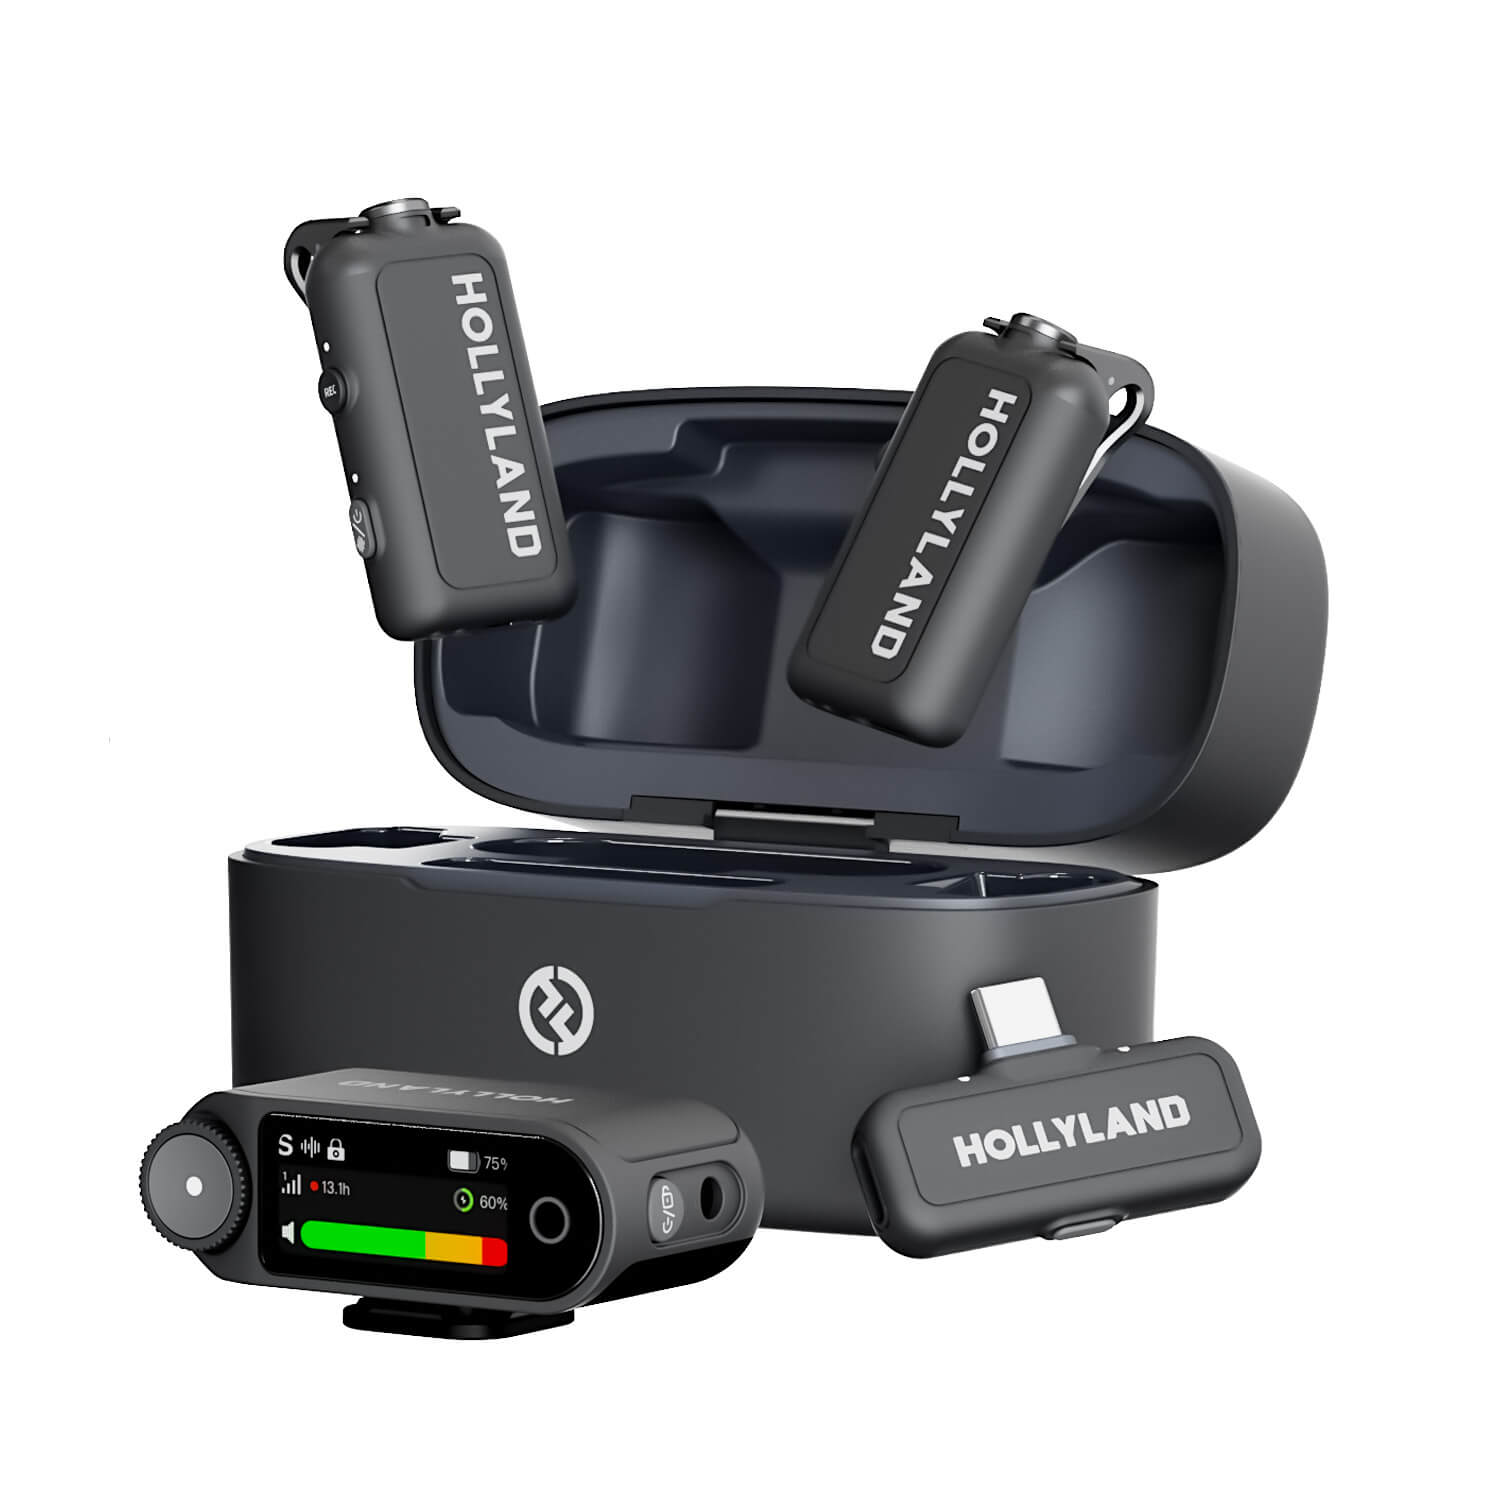
Hollyland LARK MAX 2 - Premium Wireless Microphone System
A premium wireless microphone for videographers, podcasters, and content creators to capture broadcast-quality sound.
Key Features: Wireless Audio Monitoring | 32-bit Float | Timecode
Add a Reflection Filter or DIY Vocal Booth
If you can’t treat the full room and don’t want to record in a closet, a reflection filter or portable vocal booth is a practical middle-ground option.

- Reflection filter / isolation shield ($30 to $150): A curved panel of acoustic foam that mounts on the mic stand directly behind the capsule. It absorbs rear reflections, which is the most damaging reflection zone for a cardioid mic. Widely available at music gear retailers.
- DIY blanket enclosure: Hang moving blankets or heavy curtains around three sides of your mic position. Not the most polished setup, but it works well. Many streamers and podcasters use this method between proper room treatment upgrades.
- Portable vocal booth / foam cube ($50 to $150): A compact foam enclosure designed to sit on a desk and surround the mic on multiple sides. Effective for fixed desk setups and easy to store when not recording.
- Wardrobe recording: Worth repeating: a wardrobe full of clothes remains one of the best free options available, with no setup required.
Note: Reflection filters and portable booths reduce early reflections directly around the mic but cannot fix a highly reverberant room. If your space has strong flutter echo or a long decay, you will still need broader treatment or the software tools covered in the next section.
Remove Echo in Post-Processing or in Real Time with Software
Software-based echo removal is your last line of defense, not your first. A well-placed mic in a treated room will always outperform a software-corrected recording from a poor environment. That said, these tools are genuinely useful when you have already recorded with echo or when you’re on a live call and can’t control the room.
Real-Time Tools (Calls and Streams)
- NVIDIA RTX Voice / NVIDIA Broadcast: AI-based noise and echo suppression built for streaming and video calls. Requires an NVIDIA GPU, but delivers some of the best live results available at no additional cost.
- Krisp: A background app that removes noise, echo, and reverb in real time on both your mic input and incoming audio. Available on Windows and Mac with a free tier.
- Platform built-in suppression (Zoom, Teams, Discord): Most voice and calling apps have built-in echo cancellation settings. These settings often start enabled to prevent sudden feedback loops. Still, check your audio settings before recording or calling. If room echo sounds strong, switch suppression from “Auto” to “High.” Results can vary between different apps and platforms. Still, it gives you a free starting point.
Post-Production Tools
- iZotope RX (De-reverb module): A popular choice for professional audio repair and restoration work. Its older De-reverb tool covers basic cleanup tasks quite well. Newer AI tools now offer stronger results with heavily reverberant recordings. Examples include RX’s updated Dialogue Isolate and Accentize dxRevive Pro. It is a paid option that includes many audio repair tools.
- Adobe Audition (DeReverb effect): Audition includes a DeReverb effect with visual controls accessible to intermediate users. Available as part of a Creative Cloud subscription.

- Audacity (free): Audacity lacks a dedicated de-reverb tool, but the Noise Reduction feature can reduce consistent room tone to a limited degree. Results are noticeably weaker compared to iZotope or Audition.

- Noise gate (any DAW): A noise gate silences the signal when input volume drops below a set threshold. It won’t remove echo while you’re actively speaking, but it cleanly cuts room noise and reverb tails between sentences, which meaningfully cleans up any recording for minimal effort.
Note: Software de-reverb has improved substantially with AI processing, but even the best tools leave audible artifacts when reverb is heavy. Use software correction as a supplement to room treatment and mic placement, not as a replacement for them.
Check Your Gain Staging and Recording Levels
Many beginners skip gain staging, but it directly affects how much room noise ends up in the final recording. If microphone gain is set too low, your recorded signal is quiet, and boosting it in editing amplifies not just your voice but every room reflection behind it. Set your gain so voice peaks land at -12 dB to -6 dB on the input meter. This gives you a healthy, clean signal and removes the need for heavy post-production gain increases that drag background room noise up with them.
Frequently Asked Questions
Why does my mic sound echoey on Zoom or Teams calls?
Echo on calls usually has one of two causes. First, room reflections captured by the mic. Second, your speakers feeding back into the mic. Switching to headphones eliminates speaker feedback immediately. For room reflections, move the mic closer to your mouth and check that the platform’s built-in echo cancellation is enabled in audio settings. Both fixes take under two minutes and cost nothing.
Does a noise gate remove echo?
A noise gate cuts the signal when volume drops below a threshold, which eliminates room echo between words and sentences. It does nothing to reverb that occurs while you’re actively speaking. Think of it as a cleanup tool for the silent gaps in your audio, not a solution to echo itself. Use it alongside room treatment and placement fixes, not as a standalone remedy.
Will a more expensive microphone fix echo?
Not automatically. A premium condenser in an untreated room will still capture room reflections, often more than a budget dynamic mic would. A tighter polar pattern on a higher-quality mic may help slightly, but it doesn’t change room acoustics. Fix the room and mic placement first. Then a better mic actually has something clean to capture.
Is echo the same as reverb in a microphone recording?
They’re related but not identical. Reverb is the buildup of many overlapping reflections creating a diffuse, roomy decay. Echo is a distinct, audible repeat of a sound. Home recordings almost always suffer from reverb rather than true discrete echo. Both share the same cause (reflective surfaces) and respond to the same fixes described in this guide.
Conclusion
Start with the room, then work toward the microphone itself. Move the mic closer before changing other parts of your setup. Next, consider the microphone type and its polar pattern. Add a reflection filter if your room still causes problems. Save software cleanup for recordings that need extra correction. Most echo issues need little money to improve noticeably. Simple room changes can often solve the problem first. If upgrading your mic, consider the Hollyland LARK MAX 2. Its wireless design also gives you more recording freedom.
