.png)
.png) Français
Français .png) Deutsch
Deutsch .png) Italiano
Italiano .png) 日本語
日本語 .png) Português
Português  Español
 Among the best tools for recording your screen, games or webcam is OBS Studio. It also is quite free. Conversely one of the most frequent issues is the possibility of the gathered video files turning out to be fairly large. A few seconds can use hundreds of gigabytes, maybe terabytes of storage capacity. Less than a second can allow for here.
The good news is that handling this problem does not necessitate you upgrading your computer or getting additional storage space. Just keep reading to help you to repair it. There are simple ways you might use to cut the volume of the files your OBS captures while maintaining the quality of the video and audio.
Why Are OBS Files So Large?
A few of the reasons why your OBS recordings can be taking up an excessive amount of space are as follows.
- High resolution (like 1080p or 4K)
- High frame rate (like 60 FPS)
- High bitrate settings
- Lossless or uncompressed formats
- Long recording time
OBS allows you complete control over these parameters and even minor adjustments can have a significant impact on the final result.
Step-by-Step: How to Reduce OBS File Size
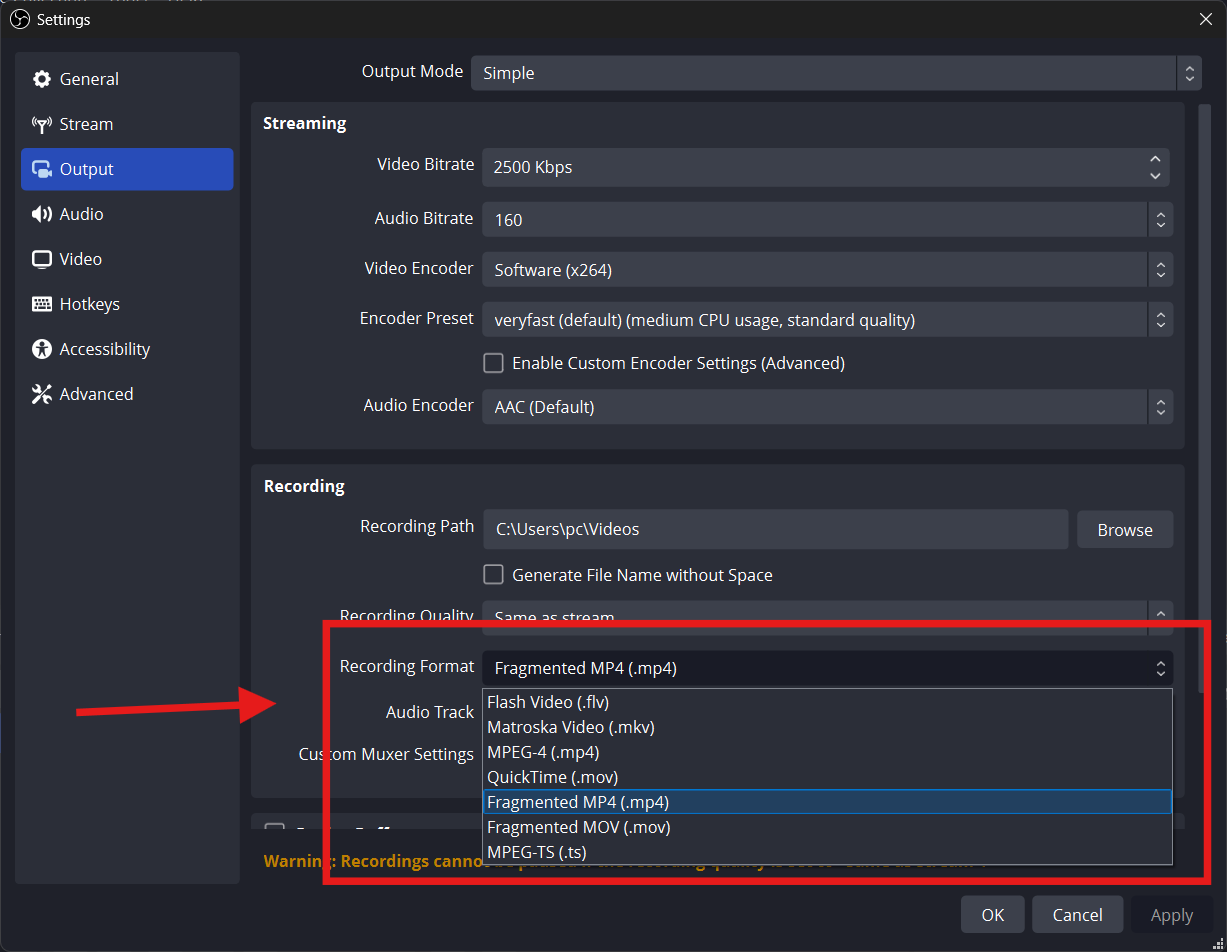
Step 1: Use the Right Recording Format
Go to:
- File > Settings > Output
- Under the Recording section look for Recording Format
- Set your format to MP4, MKV or FLV.
- MP4 is great for editing and uploading
- MKV and FLV are more stable and smaller in size
When it comes to storage capacity you should steer clear of “MOV” or uncompressed formats like AVI.
Step 2: Lower the Recording Resolution
Go to:
- Settings > Video
Here you’ll see two options:
- Base (Canvas) Resolution about the size of your screen
- Output (Scaled) Resolution about the size of your recording
To reduce file size, set your Output Resolution to 1280×720 (720p) instead of 1920×1080 (1080p).
- 720p still looks good for YouTube and most devices
- It can reduce file size by up to 50%
If you don’t need full HD, 720p is a great way to save space.

Step 3: Reduce the Frame Rate
In the same Video settings menu look for Common FPS Values.
The higher your frame rate the bigger the file size.
- Use 30 FPS instead of 60 FPS to cut file size in half
- 30 FPS is perfect for tutorials, webcam videos and simple screen recordings
Only use 60 FPS if you’re recording fast gameplay where every frame matters.

Step 4: Lower the Bitrate
Go to:
- Settings > Output > Recording
Here you’ll find the Bitrate field.
- Lowering bitrate reduces file size
- Try setting it to 2500–5000 kbps for 720p video
- For 1080p, 5000–8000 kbps works well
It is important to maintain a lower bitrate for your movies if they continue to look excellent since every kbps saved is beneficial.

Step 5: Change the Encoder
Still under Output Settings look for Encoder.
You’ll see options like:
- x264 (uses your CPU)
- NVENC (NVIDIA graphics card)
- AMD or QuickSync (other hardware options)
Employ hardware encoders such as NVENC or AMD. If you are in possession of them Both the compression of data and the recording of videos are improved.

Also under x264, change CPU Usage Preset to:
- Veryfast or Superfast
These give smaller files and use less CPU.
When presets are faster the files are smaller but the quality is slightly inferior. Give it a shot and see what you think looks the best.

Step 6: Record Shorter Clips
One easy trick, Keep your recordings short.
- Break longer videos into smaller parts
- Edit them together later, if needed.
A 30 minute recording in 1080p will take up significantly more space than a 10 minute clip that is 720p and 30 frames per second.
In order to conserve time, space and effort you should only record what you require.
Step 7: Use Simple Scenes and Sources
When you add more elements to your scene such as webcams, photos, overlays or animations. The amount of power that OBS consumes increases and the size of your file also increases.
To keep it simple:
- Use fewer scenes
- Turn off things you don’t need
- Stick to 1-2 sources when possible
Leave out any frills unless they are absolutely necessary if you are only recording your screen.
Step 8: Use CBR or VBR Wisely
Bitrate control affects your file size:
- CBR (Constant Bitrate) Keeps the file size predictable
- VBR (Variable Bitrate) Changes bitrate depending on the scene
- For small file sizes, use CBR with a lower bitrate.
If you want better quality with slightly bigger files try VBR with a set maximum.
In most cases CBR + 2500–5000 kbps works great.
Step 9: Compress Videos After Recording (Optional)
You can use a video program to compress videos that you have previously captured if they are too huge to be recorded in their original format.
Try one of these free tools:
- HandBrake (Windows, Mac)
- VLC Media Player
- Clideo (Online)
- CapCut (Mobile and desktop)
You can:
- Lower resolution
- Change format to MP4
- Reduce bitrate
- Trim unneeded parts
If you do not wish to re-record anything in OBS this is a handy feature to have.
How Much Space Can You Save?
Let’s look at a quick example:
| Settings | File Size (10 min video) |
| 1080p / 60 FPS / 10,000 kbps | ~1.2 GB |
| 720p / 30 FPS / 3000 kbps | ~250 MB |
This is a significant difference and the second choice is still appealing for the majority of applications.
Best Settings for Small File Size and Good Quality (Quick Guide)
Try these if you want the greatest possible balance between the size of the file and its quality
- Resolution: 1280×720 (Output)
- FPS: 30
- Bitrate: 3000–5000 kbps
- Encoder: Hardware (NVENC, AMD, etc.)
- Format: MP4 or MKV
- Preset: Veryfast (x264)
These settings will keep your files short and will work great for tutorials, webcams or casual gameplay. Additionally, they will maximize your efficiency.
Conclusion
In order to use OBS you do not need a supercomputer or a massive hard disk. OBS recording area may be limited by resolution, bitrate and device encoding.
You should begin by briefly explaining and testing the new settings and then proceed to make any necessary adjustments. You will be able to reduce space, speed up editing and upload without compromising the quality of your work after you have found the optimal combination.
FAQs
1. What’s the best format for smaller file size in OBS?
People have the misconception that MP4 and MKV are two of the better formats that are available. It is strongly recommended that you should not make use of uncompressed formats such as AVI under any circumstances.
2. Does lowering resolution really save space?
Indeed! There is a possibility that the resolution of your file might decrease from 1080p to 720p which would result in a significant reduction in its size by almost half.
3. What bitrate should I use for 720p videos?
Your bandwidth should be increased to a range of between 250 and 4000 kbps. The files that are of a size and quality that are adequate and that fall within this range will not be too expensive.
4. Will these settings make my video look bad?
The response is no but subject to the proviso that you do not drop below a given level. If you consider everything, 720p and 30 frames per second still seem amazing to the large majority of spectators.
5. Can I compress old OBS videos I already recorded?
Not a secret at all! The file size may be reduced without the need to rerecord using HandBrake or VLC. The space will be preserved. Pick one of the two available choices here.