.png)
Learning how to add silence to your audio in Audacity isn’t just about fixing mistakes; it is a fundamental part of controlling the rhythm and quality of your production. generally, editors use silence for two very different reasons, and knowing which one you need is crucial for your workflow.
Here is the difference between the two main approaches:
1. Pacing (Inserting Silence)
This method involves adding new time to your track. If you rushed through a script or transitioned between two distinct topics too quickly, you need to physically insert a gap.
- The Goal: To let the audio “breathe” and give the listener time to process information.
- The Result: This pushes all subsequent audio to the right, extending the total length of your project.
2. Cleaning (Muting Audio)
This method involves silencing a specific section of the waveform without moving anything on the timeline. This is essential for removing distractions like loud breaths, coughs, or background thuds.
- The Goal: To remove noise without de-syncing your voiceover from background music or video tracks.
- The Result: The total duration of the track remains exactly the same; the noisy section simply becomes silent.
Understanding the distinction of insert silence vs. mute is the first step to a clean edit. “Inserting” fixes the flow, while “Muting” fixes the quality.
Method 1: Inserting Silence (To Create a Pause)
Use this method when you need to create a gap between two segments, such as a longer pause between sentences in a podcast or breathing room before a music drop.
Unlike muting existing audio, this technique physically inserts new time into your track. It shifts all audio to the right of your cursor further down the timeline, increasing the total length of your project.
Follow these steps to insert silence:
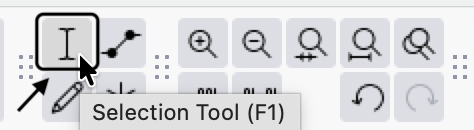
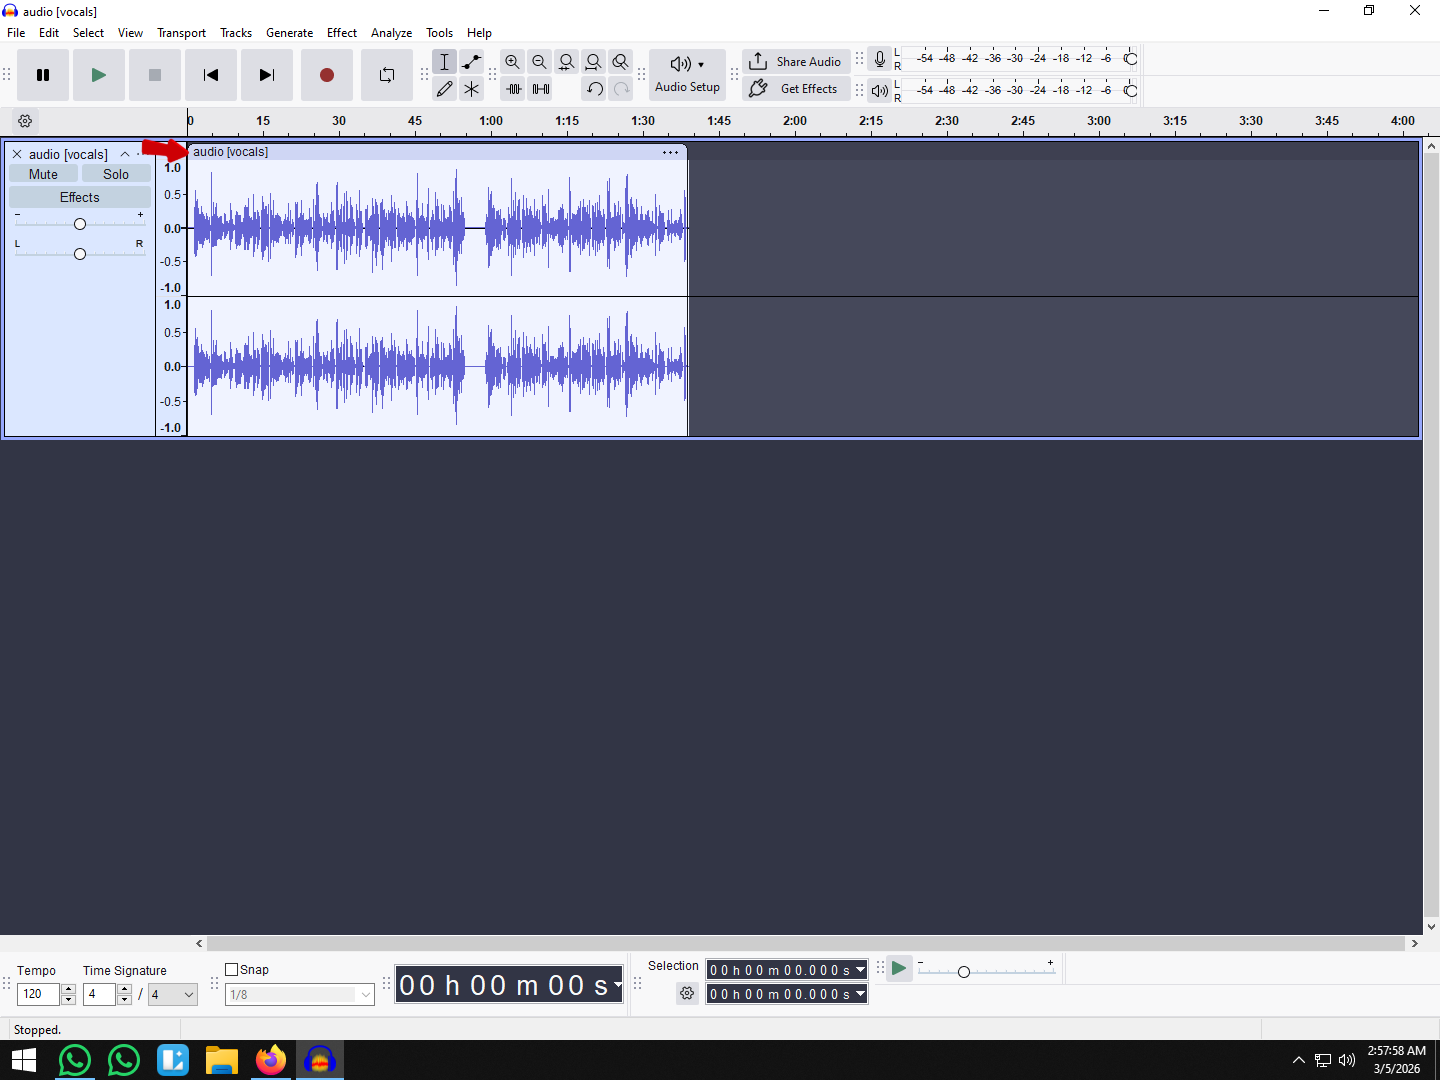
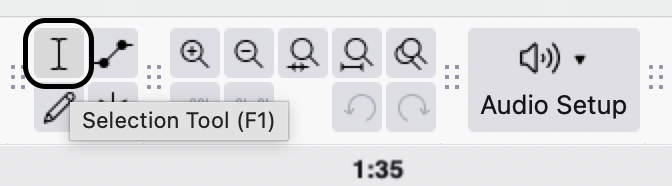
- Select the Selection Tool (the “I-beam” icon) in the top toolbar.
- Click the exact location on the waveform where you want the pause to begin.

- Go to the top menu bar and select Generate > Silence.
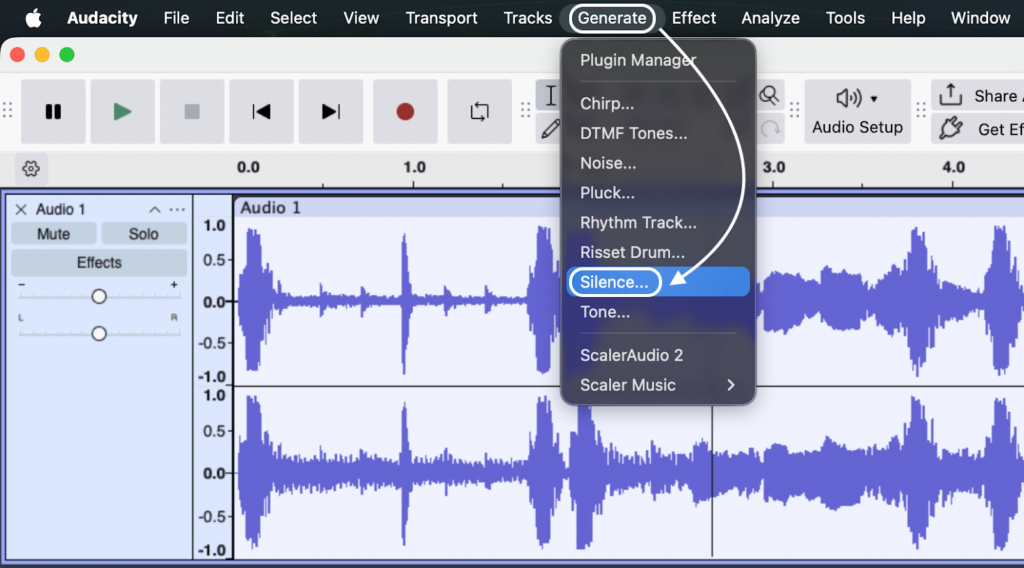
- Enter the desired length of the pause in the Duration box (e.g., 00 h 00 m 05 s for 5 seconds).
- Click Generate.

[Visual Note: A flat line will appear at your cursor position, and the rest of your audio will shift right to accommodate the new pause.]
Method 2: Silencing a Section (To Remove Noise)
While “Inserting Silence” adds new time, Silencing Audio replaces existing audio with a flat line.
This distinction is critical. If you use the “Insert” method to cover up a cough, you will push the rest of your conversation out of sync. If you simply hit the Delete key, you remove that timeframe entirely, causing the audio to snap to the left and ruining the timing of any background music.
Silencing Audio is the correct way to remove unwanted noises—like breaths, mouth clicks, or sirens—without altering the total length of your track.
How to Silence Audio Without Moving the Track
The fastest way to do this is by using the keyboard shortcut.
- Select the Noise: Using the Selection Tool (I), highlight the specific section of the waveform you want to mute.

- Apply the Command:
- Windows: Press Ctrl + L
- Mac: Press Cmd + L
- Check the Result: The jagged waveform will instantly turn into a flat horizontal line, indicating zero volume.

Alternative Menu Method:
If you prefer using the mouse, you can achieve the same result by navigating to the top menu bar and selecting: Edit > Remove Special > Silence Audio.

Method 3: Adding Silence to the End of a Track
A frustrating issue for beginners is exporting a project only to find the audio cuts off abruptly. This happens because Audacity ends the file exactly where the waveform stops. If you have applied effects like Reverb or Delay, the “tail” of the effect (the sound fading out) gets chopped off.
To prevent this, you need to extend the track by generating a buffer of silence at the very end.
Here is how to extend your track safely:
- Move the Cursor to the End: Press the Skip to End button on the transport toolbar (or press K on your keyboard) to ensure your cursor is at the exact end of the audio.

- Open the Generator: Go to the top menu and select Generate > Silence.

- Set Duration: Enter the amount of time you want to add. Usually, 2 to 5 seconds is enough to catch fading reverb or provide a clean buffer before the next track starts.
- Confirm: Click Generate.

You will now see a flat line added to the end of your track. When you export the final MP3 or WAV, the player will continue through the silence, allowing your audio to fade out naturally.

Pro Tip: “True Silence” vs. “Room Tone”
While the Generate > Silence tool is useful, strictly using it can actually ruin the immersion of your recording. This is due to the difference between Digital Silence and Room Tone.
When you record audio—even in a quiet studio—your microphone picks up a low-level background hum known as the noise floor (air conditioning, computer fans, or electrical hiss).
- Digital Silence: This is what Audacity creates when you use the Silence tool. It is an absolute “flat line” (0 dB). If you insert this into a normal recording, the background hiss suddenly vanishes, creating a jarring “black hole” effect. It sounds like the listener’s speakers just turned off.
- Room Tone: This is the natural sound of your recording environment when no one is speaking.
How to Fix It
Instead of generating absolute silence, you should paste Room Tone over the sections you want to mute:
- Find a 2-3 second section of your track where you aren’t speaking (just the background hum).

- Highlight it and press Ctrl + C (Copy).
- Highlight the breath, cough, or mistake you want to remove.
- Press Ctrl + V (Paste).

This replaces the mistake with natural ambience, making the edit invisible to the listener.
Hardware Insight: If you’re constantly fighting background hiss or fixing distorted peaks, the problem might be your hardware, not your software. Using a system like the Hollyland LARK MAX 2 gives you Studio Quality (48kHz/24-bit) audio right out of the gate. Plus, its 32-bit Float Recording prevents audio clipping, meaning you won’t have to do nearly as much “rescue editing” in Audacity later.

Hollyland LARK MAX 2 - Premium Wireless Microphone System
A premium wireless microphone for videographers, podcasters, and content creators to capture broadcast-quality sound.
Key Features: Wireless Audio Monitoring | 32-bit Float | Timecode
Troubleshooting Common Issues
Even simple tools can behave unexpectedly if the settings aren’t quite right. If you are struggling to make the silence feature work, check these two common roadblocks.
Why is “Generate Silence” Greyed Out?
This is the most frequent issue for new Audacity users. If you open the Generate menu and the “Silence” option is greyed out, it is because your audio is currently Paused, not Stopped.
Audacity locks most editing functions while a file is in “Pause” mode to prevent errors.
- The Fix: Look at the Transport Toolbar (the play buttons). If the Pause button (two vertical lines) is depressed, click the Stop button (the yellow square) to fully release the track. The Generate menu will now be active.
Inserting Silence Desynced My Other Tracks
If you are editing a multi-track project—such as a podcast with background music—inserting silence on one track can ruin your timing.
When you use the “Insert Silence” method, Audacity pushes all audio on that specific track to the right. However, it does not automatically move the audio on the tracks below it. This causes your dialogue to fall out of sync with your music.
- The Fix: Enable Sync-Lock Tracks.
- Go to Tracks in the top menu bar.
- Check Sync-Lock Tracks.

- When you insert silence now, Audacity will add equal empty space to all tracks at that timestamp, keeping everything aligned.
Frequently Asked Questions (FAQ)
What is the shortcut to add silence in Audacity?
It depends on which type of silence you need:
- To Mute Existing Audio: The default shortcut is Ctrl + L (Windows) or Cmd + L (Mac). This turns the selection into a flat line without changing the track length.
- To Insert New Silence: There is no default shortcut for the Generate > Silence menu option. However, you can create one by going to Audactiy > Preferences > Shortcuts, searching for “Silence,” and assigning your own key combination.


How do I extend a song with silence in Audacity?
To add a buffer to the end of a track:
- Click the very end of the existing waveform using the Selection Tool.

- Go to Generate > Silence.

- Enter the duration you want to add (e.g., 5 seconds) and click Generate.

Can I insert silence in multiple tracks at once?
Yes. To insert silence across all tracks simultaneously without losing sync:
- Click and drag your cursor vertically across all the tracks you want to affect. Alternatively, press Ctrl + A (Cmd + A) to select everything.

- Click the point on the timeline where you want the silence to begin.
- Go to Generate > Silence and choose your duration.


Conclusion
Mastering silence is what separates an amateur recording from a professional production. Whether you are inserting a dramatic pause to let a point land or surgically muting a distracting breath, these tools give you total control over the rhythm of your audio.
If you take one thing away from this guide, make it the Ctrl + L (Cmd + L on Mac) shortcut. Memorizing this single command will save you hours of manual clicking.
Remember, while Audacity is powerful enough to fix mistakes, the best editing strategy is a clean recording. Using high-quality gear like the Hollyland LARK MAX 2 ensures your raw audio is crisp from the start, so you can spend less time fixing “dead air” and more time creating content.