.png)
Ever wondered how to add audio to a still photo for your Instagram Reels or TikTok? Sometimes, even a simple image paired with the right music can get tons of views and attention—just because the sound brings it to life.
Whether it’s a favorite song, a voiceover, or a trending sound, adding audio can turn a static picture into something scroll-stopping. The good news? You don’t need fancy tools to do it. In this guide, we’ll show you three easy (and free) ways to add audio to a photo using different devices.
The Basic Process: 3 Simple Steps
To add audio to a picture, you typically need a video or slideshow editing tool. It can be an online web-based tool, a mobile application, or a desktop application.
Regardless, the overall process typically involves three main actions:
- Import the image – Select the picture you want to enhance.
- Add the audio – Upload or record a music track or voiceover.
- Sync and export – Adjust the duration so they match, then save it as a video.
Let’s explore each method in more detail.
Method 1: Add Audio to a Picture Using an Online Tool (e.g., EchoWave)
Online editors are perfect if you don’t want to install anything. Some most popular ones are:
- EchoWave
- Kapwing
- Vondy
- Movie Maker Online
Here’s a step-by-step example using EchoWave, a free online tool that requires no signup or software installation.

1. Upload Your Image
Open your web browser and visit the EchoWave “Add Audio to Photos” tool.
- Click on “Choose Files” to select the image you want to upload.
The platform supports common formats like JPG, PNG, and more. Once your image is uploaded, the editing workspace will appear.

2. Add Audio from Your Device
At the top of the interface, click on “Add Media”. From there, choose an audio file—such as background music, a narration, or any sound clip stored on your device. This audio will now appear in the timeline below your image.
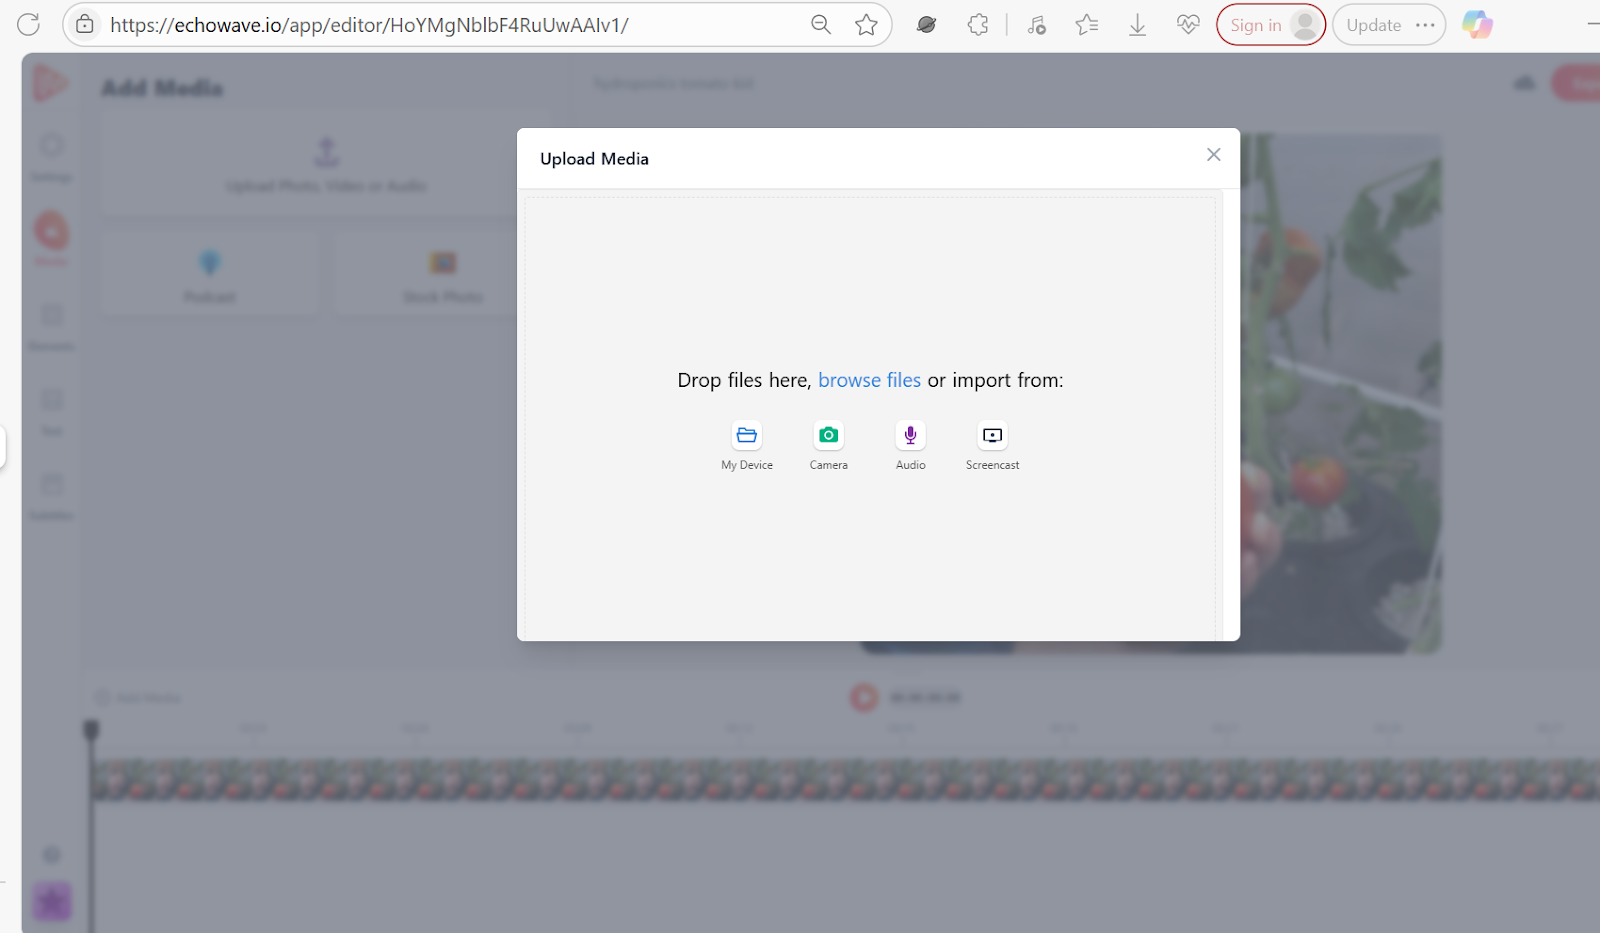


3. Record Your Voice (Optional)
If you prefer to record a live voiceover, click the “Audio” tab. Grant the tool permission to access your microphone.
- Record your voice.
- Once done, click on “Submit Recorded Voice” (the Blue Circle), to add it to the timeline.

4. Sync the Image and Audio
Return to the editing interface. Make sure your image duration matches the audio length. You can extend the display time of the image or trim the audio to sync them perfectly.

5. Export the Project as a Video
Once everything is aligned, click the “Export Video” button. EchoWave offers two output options:
- Draft: Faster download with larger file size and slightly lower quality (no sign-up required).
- Best Quality: Higher-quality output, but requires creating a free account.
Select your preferred option, then click “Render” to begin processing the video.


6. Download Your Final Video
When rendering is complete, you’ll be able to download the video file. If you’re using the free version, the video will include a watermark. To remove it and unlock more features, you can sign up for a free EchoWave account.
Method 2: Add Audio to a Picture Using a Desktop App (e.g., Clipchamp)
If you prefer working offline or need more control, desktop apps offer powerful editing capabilities. Two commonly used apps are:
- Clipchamp (for Windows users)
- iMovie (for macOS users)
Let’s focus on Clipchamp, a free Windows video editor that provides a user-friendly interface and access to stock media.
1. Install Clipchamp
Open your Start Menu and search for “Clipchamp.” If it’s not already installed, download it for free from the Microsoft Store.

2. Sign in to Your Microsoft Account
Launch the app and sign in using your Microsoft credentials. This allows you to save and access projects across devices.

3. Start a New Video Project
Once you’re in the app, click on “Create a new video”. This opens up the editing dashboard where you’ll assemble your image and audio.


4. Import the Image
In the editing window, click the “Import media” button. Choose the image file you want to use.
You can upload it directly from your computer, drag and drop it into the window, or import it from cloud services like Google Drive.

5. Add Audio to the Project
Repeat the same process to upload your audio file. You can choose music or narration stored locally or explore Clipchamp’s Content Library, which includes a collection of free stock music and sound effects.


6. Record a Voiceover (Optional)
If you want to record a narration:
- Click on “Record & Create” in the sidebar.
- Then select “Audio.”
A screen will appear that lets you record your voice. Ensure your microphone is connected and authorized and the Clipchamp app has access to your microphone.
You can use a quality external microphone, such as the Hollyland LARK M2, to record professional-grade audio for your picture.

Hollyland LARK M2 - Mini Lavalier Microphone
An incredibly lightweight and compact wireless button microphone that captures high-fidelity audio.
Key Features: 9g Button Size | 48 kHz/24-bit | 40 Hours Battery
- After recording, click “Save and edit” to return to the main editing interface.


7. Add Media to the Timeline
Click the “+” icon on the image and audio files to add them to the timeline. The image will appear on the video track, and the audio will be placed on the sound track below it.

8. Sync Duration of Image and Audio
You may need to adjust the length of the image to match the audio. Drag the edge of the image block to extend its duration, or trim the audio to fit using the timeline handles.

9. Customize the Image
Click on the image to access editing tools. You can resize, crop, rotate, or apply filters. If you’ve added multiple images, go to the “Transitions” tab to add smooth effects between them.

10. Export the video
When you’re satisfied with the result, click “Export” in the top-right corner. You can choose from multiple resolutions (480p, 720p, 1080p). The MP4 video will be saved to your Downloads folder by default.

11. Share or Save Your Video
Once exported, you can upload your video directly to YouTube, save it to Google Drive, or store it locally. Clipchamp also has a browser-based version with similar functionality if you prefer not to use the desktop app.
There’s also a web version of Clipchamp that you can access via a browser. It offers the same chief functionalities and features as the desktop app.
Method 3: Add Audio to a Picture Using a Mobile App
If you prefer editing directly on your phone, there are many mobile apps available for both Android and iOS that let you add voiceovers or music to a photo. Some popular apps include:
- CapCut
- Inshot
- PowerDirector
Let’s take a closer look at how to use CapCut on an Android smartphone to add audio to a picture.

1. Install and Open the App
Download CapCut from the Google Play Store. It’s free to use and offers a range of editing tools designed for both beginners and casual creators.

2. Start a New Project
From the app’s home screen, tap “New project.” You’ll be prompted to select media from your device.
Choose the photo (or multiple photos) that you want to use, then tap “Add” at the bottom of the screen to begin editing.

3. Add the Photo to the Timeline
Once the photo is added, it appears on the main editing timeline. You can adjust the photo’s display duration by tapping on it, then dragging the ends of the clip left or right on the timeline to make it longer or shorter.


4. Add Background Music or Sound
Tap “Audio” from the menu bar, then select “Sounds.” CapCut provides a library of stock music categorized by mood, genre, and theme. Browse the available tracks.
Once you find one you like, tap the download icon (if needed), and then press the “+” button to add it to your timeline.

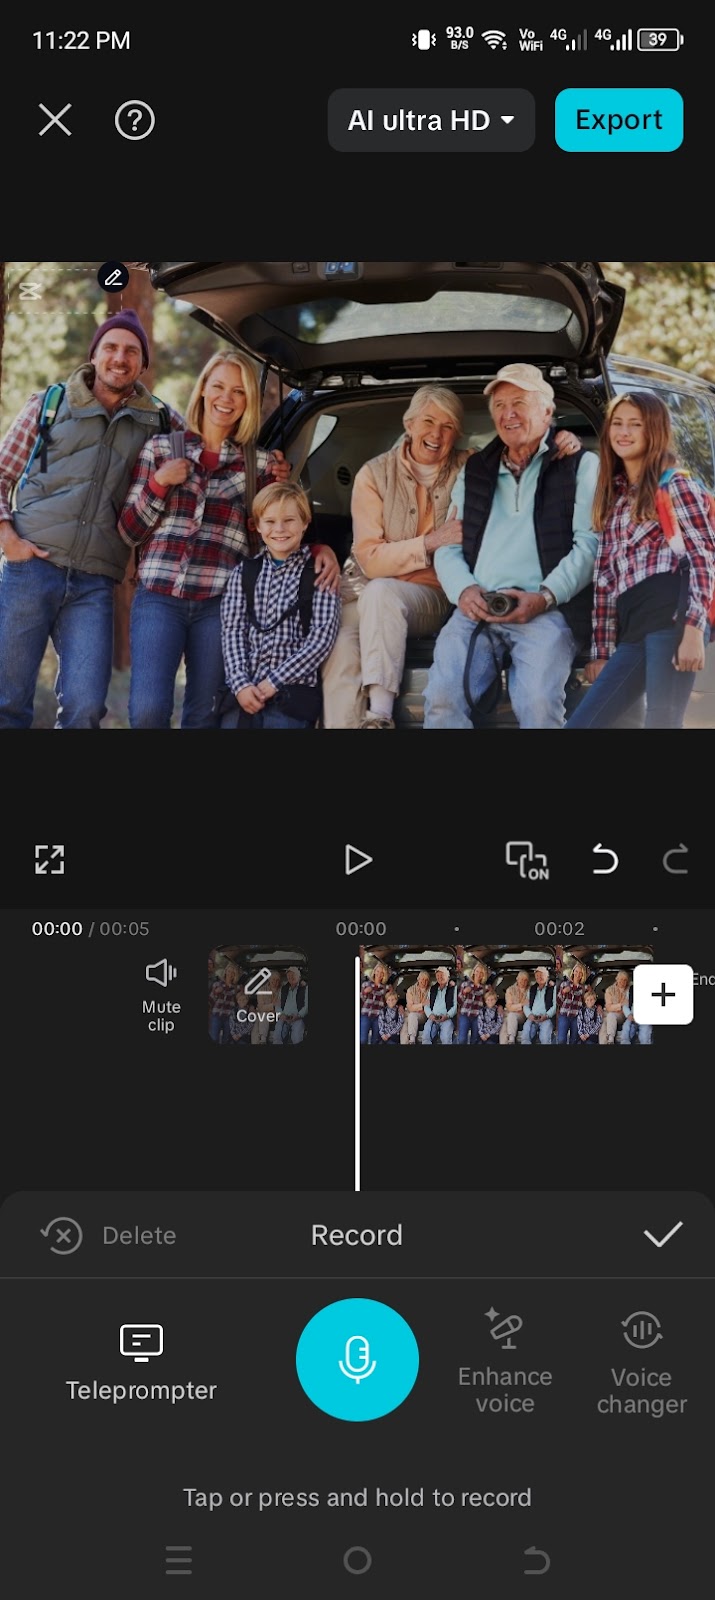

5. Other Audio Options – Record, Extract, or Use Text-to-Speech
CapCut offers several ways to personalize your audio:
- Extract from video: Tap the folder icon in the “Sounds” section to extract audio from an existing video on your device.
- Record voice: Tap “Record” to capture a voiceover directly in the app. Grant microphone permission if prompted.
- Generate voiceover: You can also use the Text-to-speech feature. Enter text, choose a voice style, and the app will generate a spoken version you can insert into your video.

6. Adjust the Image Duration
To match the image duration with your audio, tap on the photo in the timeline and hold the edge to drag it. This helps you sync the visual length with the accompanying sound for a seamless experience.


7. Edit and Trim the Audio
If the audio is longer than needed, you can trim it:
- Tap on the audio track in the timeline.
- Move the playhead (cursor) to where you want to cut.
- Tap “Split” at the bottom to divide the audio.
- Select the unwanted section and tap “Delete.”
This gives you precise control over what parts of the audio play.


8. Export and Save the Video
Once you’re satisfied with your project, tap the “Export” button at the top-right corner of the screen. You can also adjust video settings—such as resolution—by tapping “Ultra HD” before exporting. CapCut will then process your video and save it to your device.
Tip: CapCut also offers a desktop application and a browser-based version with similar features for those who prefer editing on larger screens.
Conclusion
Now you know how to add audio to a picture using online tools, desktop apps, and mobile apps. Whether you’re using EchoWave in your browser, Clipchamp on your PC, or CapCut on your phone, the process follows the same basic flow, you import the image, add your audio, and export as a video.
FAQs
Q: What file format do you typically get after adding audio to a picture?
When you add audio to an image, it becomes a multimedia file. The most common export formats are MP4, AVI, or MOV, depending on the tool you use. These formats are widely supported and ideal for sharing on social media or uploading to platforms like YouTube.
Q: What types of audio can I insert into a picture?
To insert audio into a picture, you can use several types of audio, including: Voice recordings (recorded live), background music or soundtracks, stock music from the app’s library, extracted audio from videos, and aI-generated voiceovers via text-to-speech. Choose the type that best complements the message or mood of your photo.