.png)
You just finished recording what you thought was a perfect take, but when you hit play, you sound like you are speaking into a pillow. If you are looking for how to fix muffled audio in Audacity (troubleshooting guide), you are in the right place.
Muffled, muddy, or “underwater” audio is incredibly frustrating, but it is also one of the most common issues creators face. Fortunately, you can salvage your recording with a few quick software tweaks. Let’s look at why this happens and exactly how to fix it step-by-step.
Why Your Audio Sounds Muffled in Audacity (The Root Causes)
Before applying software fixes, you need to understand why your audio lacks clarity. Diagnosing the specific root cause prevents you from making the same mistake on your next recording.
Here are the most common reasons your audio sounds muffled in Audacity:
- Poor Microphone Placement: Speaking off-axis (away from the center of the mic capsule) or sitting too far back prevents the microphone from capturing the crisp, high frequencies of your voice.
- Hardware Limitations: Built-in laptop microphones or cheap headsets physically lack the frequency response required to record clear, professional treble.
- The Proximity Effect: Getting too close to a directional microphone artificially boosts the bass frequencies. This overpowers the highs and creates a thick, muddy sound.
- Aggressive Noise Reduction: Over-applying Audacity’s built-in noise reduction is the number one cause of ruined audio. It strips away background hiss, but it also destroys the vital high frequencies of your voice, leaving behind a robotic or “underwater” effect.
Method 1: Use Filter Curve EQ to Apply a “Treble Boost” (Best Fix)
If your recording sounds like you are speaking into a blanket, it is severely lacking in high-end frequencies (treble). The fastest and most effective software fix is using Audacity’s built-in Equalization (EQ) tools to artificially boost those missing highs and restore vocal clarity.
Here is exactly how to apply a treble boost to your muffled track:
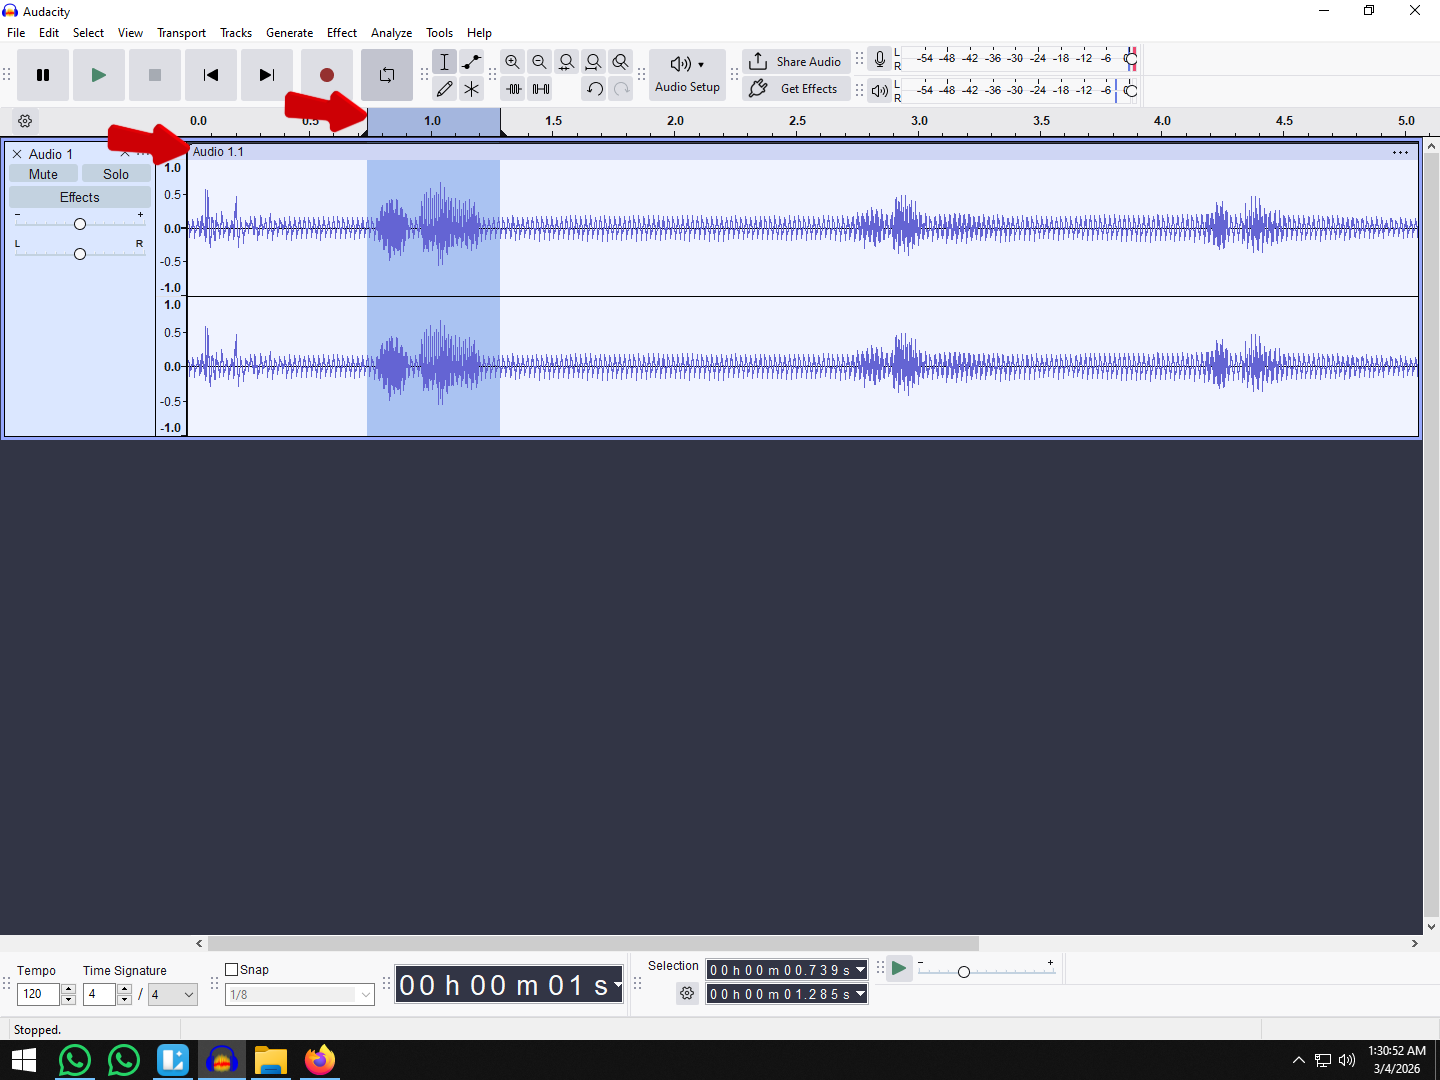
- Highlight your audio: Click and drag your mouse over the muffled section of your audio track (or press Ctrl+A / Cmd+A to select the entire recording).

- Open the EQ tool: Navigate to the top menu and select Effect > EQ and Filters > Filter Curve EQ.

- Apply the preset: In the bottom left corner of the window, click Presets & Settings > Factory Presets > Treble Boost.

- Preview and Apply: Click the Preview button to hear the changes, then click Apply once you are satisfied.
💡 Pro Tip: Watch out for piercing “S” sounds!
Do not just apply the preset blindly. While the default Treble Boost adds instant crispness, it can sometimes make your “S” and “Sh” sounds (sibilance) incredibly harsh. If the vocal sounds too sharp or hissy during your preview, click the green line on the EQ graph around the 4kHz to 8kHz range and drag the curve down slightly. This will keep the clarity while taming the painful high frequencies.
Method 2: Apply a High-Pass Filter to Remove Muddy Lows
Sometimes your audio doesn’t actually need more treble. Instead, it suffers from too much low-end rumble that masks the clarity of your voice. A High-Pass Filter solves this by letting high frequencies “pass” through while completely cutting out the muddy, booming bass frequencies.
Here is how to quickly clean up low-end mud in Audacity:
- Select your audio track by double-clicking it or pressing Ctrl+A (Windows) / Cmd+A (Mac).

- Navigate to the top menu and click Effect > EQ and Filters > High-Pass Filter.

- Set the Frequency (Hz) box to a value between 80Hz and 100Hz. This is the vocal sweet spot. It eliminates low-frequency noise like air conditioner hums, desk vibrations, and mic stand bumps without thinning out the natural depth of the human voice.
- Set the Rolloff dropdown to either 12 dB or 24 dB per octave. This setting controls how aggressively the bass is cut below your chosen frequency. A 12 dB rolloff provides a gentle, natural cut, while 24 dB is better if you have severe background rumble.
- Click Apply to process the effect.

Pro Tip: If your voice still sounds a bit thick or “boomy” after applying the filter at 80Hz, hit Undo (Ctrl+Z) and try bumping the frequency up to 100Hz or 120Hz. Be careful not to go too high, or your voice will start to sound thin and tinny like a telephone call.
Method 3: Dial Back the Noise Reduction (Fixing the “Underwater” Sound)
If your audio suddenly sounds like you are speaking from the bottom of a swimming pool, you have likely fallen into the most common Audacity trap: over-applied Noise Reduction.
When you push Audacity’s noise reduction settings too high, the software struggles to separate background hiss from the high frequencies in your voice. As a result, it aggressively deletes both, leaving you with a robotic, heavily muffled vocal track.
To fix this, you must undo the damage and apply a much lighter touch:
- Undo your previous edit: Press Ctrl+Z (Windows) or Cmd+Z (Mac) immediately to remove the heavy noise reduction and restore your original, unedited audio.
- Re-open the effect: Highlight your track and navigate back to Effect > Noise Removal and Repair > Noise Reduction.

- Lower the reduction level: Locate the Noise reduction (dB) slider. Instead of cranking it up to the default or higher limits, drop this setting down to a conservative 6 to 10 dB.
- Apply the fix: Click OK and play back your audio. Your voice should retain its natural crispness while gently reducing the worst of the background hum.

The Golden Rule of Audio Editing: It is always better to leave a tiny bit of natural background hiss in your recording than to create a completely muffled, robotic-sounding voice. Never sacrifice vocal clarity just to get a perfectly silent background.
The “Garbage In, Garbage Out” Rule: Preventing Muffled Audio at the Source
In the audio engineering world, there is a harsh but universal truth: “Garbage in, garbage out.”
Software tools like Audacity’s Filter Curve EQ can only boost frequencies that actually exist in your recording. If your microphone is cheap or damaged, it simply won’t capture the high-end frequencies required for crisp, intelligible speech. You cannot EQ frequencies that were never recorded in the first place.
If you constantly find yourself fighting muddy audio in post-production, the problem isn’t your editing skills—it’s your hardware. To permanently fix the issue, you need a microphone that captures a pristine source file. For creators tired of salvaging bad audio, the Hollyland LARK MAX 2 is the ultimate upgrade. It is engineered to bypass the need for heavy Audacity editing altogether.

Hollyland LARK MAX 2 - Premium Wireless Microphone System
A premium wireless microphone for videographers, podcasters, and content creators to capture broadcast-quality sound.
Key Features: Wireless Audio Monitoring | 32-bit Float | Timecode
Studio Quality Audio (48kHz/24-bit)
The LARK MAX 2 captures incredibly dense, high-resolution audio natively. Its 48kHz/24-bit audio paired with professional ENC (Environmental Noise Cancellation) ensures your voice is recorded with crystal-clear highs and rich, resonant lows. Because the microphone captures the full frequency spectrum accurately, your voice will never sound like it is trapped under a blanket, completely eliminating the need for aggressive EQ boosts in Audacity.
32-bit Float Recording
Sudden loud noises—like laughing, yelling, or recording in a noisy environment—cause traditional audio to “clip.” Clipping permanently destroys the audio waveform, resulting in a distorted, crushed, and muffled sound that no software can fix. The LARK MAX 2 features 32-bit Float Recording, providing virtually infinite dynamic range. It simply never distorts, ensuring your audio remains pristine no matter how loud the source gets.
Wireless Audio Monitoring
The easiest way to prevent muffled audio is to hear it before you hit record. Poor mic placement (like burying a lavalier mic under a thick shirt) is a leading cause of muddy sound. The LARK MAX 2 solves this by allowing you to monitor your audio wirelessly in real-time using their new OWS earphones. You can hear exactly how you sound, allowing you to adjust your microphone placement perfectly and guarantee crisp audio from the very first take.
3 Pro Tips for Recording Crisp Audio (No Software Needed)
The best way to fix muffled audio in Audacity is to prevent it from happening in the first place. Before you even hit record, use these physical acoustic techniques to capture crystal-clear sound directly at the source.
1. Follow the “Fist” Rule for Distance
Positioning your microphone too far away introduces hollow room echo, while getting too close causes a bass-heavy, muffled tone known as the proximity effect. To find the acoustic sweet spot, place your hand in a fist between your mouth and the microphone. This 6-to-8-inch distance ensures you capture clear, natural vocals without unwanted muddiness.
2. Speak Directly “On-Axis”
Most microphones are highly directional. They are designed to capture crisp, high-frequency details directly from the front. If you speak into the side or top of the mic (off-axis), your voice will instantly sound dull and muffled. Always ensure the front of the mic capsule is pointed directly at your mouth, rather than aimed down at your chin or chest.
3. Attach a Pop Filter
Hard consonant sounds like “P” and “B” (plosives) push aggressive bursts of air directly into the microphone capsule. This creates a booming, muffled thud that can ruin an otherwise perfect take. A simple mesh pop filter diffuses these air bursts. This allows you to get close to the mic for an intimate, professional sound without the destructive low-end rumble.
Frequently Asked Questions (FAQ)
Why does my voice sound like it’s underwater in Audacity?
Your voice sounds “underwater” or robotic because of over-processed Noise Reduction. When you set the noise reduction slider too high, Audacity aggressively removes frequencies shared by both the background noise and your voice. To fix this, undo the effect and reapply it with a lower setting—ideally between 6 dB and 10 dB—to preserve the natural high frequencies of your vocals.
Can I completely fix muffled audio?
You can significantly improve it, but you cannot perfectly restore frequencies that your microphone failed to capture in the first place. Software EQ acts like a magnifying glass; it can only boost high-end treble if those frequencies exist in the raw recording. If your microphone physically couldn’t capture those crisp details, heavy EQ will simply amplify digital noise and hiss.
What is the best EQ setting for clear vocals in Audacity?
The best baseline EQ for crisp, clear vocals involves two steps: applying a gentle High-Pass Filter at 80Hz to remove low-end rumble, and adding a slight Treble Boost between 4kHz and 8kHz. This combination cuts out muddy room noise while enhancing the natural presence and clarity of human speech. Always adjust these settings slightly based on your specific voice type to avoid piercing “S” sounds (sibilance).
Conclusion & Next Steps
Fixing muffled audio in Audacity doesn’t have to be a guessing game. By following the correct editing sequence, you can instantly breathe life back into a muddy recording.
To salvage your current track, follow this proven workflow:
- Undo aggressive Noise Reduction to eliminate that robotic, “underwater” sound.
- Apply a High-Pass Filter (80Hz – 100Hz) to strip away muddy low-end rumble.


- Use the Filter Curve EQ to add a gentle Treble Boost, restoring crispness and clarity to your vocals.


Test these Audacity settings to rescue your audio today. However, remember the golden rule of audio engineering: software cannot magically create frequencies your microphone failed to capture in the first place.
If you find yourself spending hours tweaking EQs and fighting muffled audio after every single shoot, it is time to upgrade your hardware. The Hollyland LARK MAX 2 eliminates post-production headaches at the source. With its studio-quality 48kHz/24-bit audio and 32-bit float recording, you capture pristine, distortion-free sound the moment you hit record.
Stop wasting hours trying to fix bad audio in post-production. Upgrade to the Hollyland LARK MAX 2 and get back to doing what you do best—creating great content.