.png)
If you tried to drag a voice recording from a mobile phone or an older audio recorder into Audacity, you likely hit a wall. Instead of a waveform, you got an error message stating the file type is not supported.
You aren’t dealing with a corrupted file. The problem is simply a language barrier between your audio file and the software.
AMR (Adaptive Multi-Rate) is a compression format designed specifically for speech. It was the industry standard for older mobile phones and voice memo apps because it creates incredibly small file sizes. However, these small files come with heavy compression and specific licensing rules.
Audacity is free, open-source software. To keep it free and legally compliant, the developers cannot include “patent-encumbered” codecs like AMR in the default download. This means Audacity doesn’t have the legal right to decode these files out of the box.
The Solution: FFmpeg
To fix this, you need to install the FFmpeg Import/Export Library. Think of FFmpeg as a “universal translator” plugin. It bridges the gap, legally allowing Audacity to read proprietary formats like AMR, M4A (AAC), and WMA. Once installed, Audacity will treat your AMR file just like a standard WAV or MP3.
Here is exactly how to open and edit AMR files in Audacity using two different methods.
Method 1: Install FFmpeg to Open AMR Directly (Recommended)
This is the best long-term solution. Once you install the FFmpeg library, you won’t have to worry about this error again for AMR or other common formats like M4A.
Follow these steps to enable AMR support:
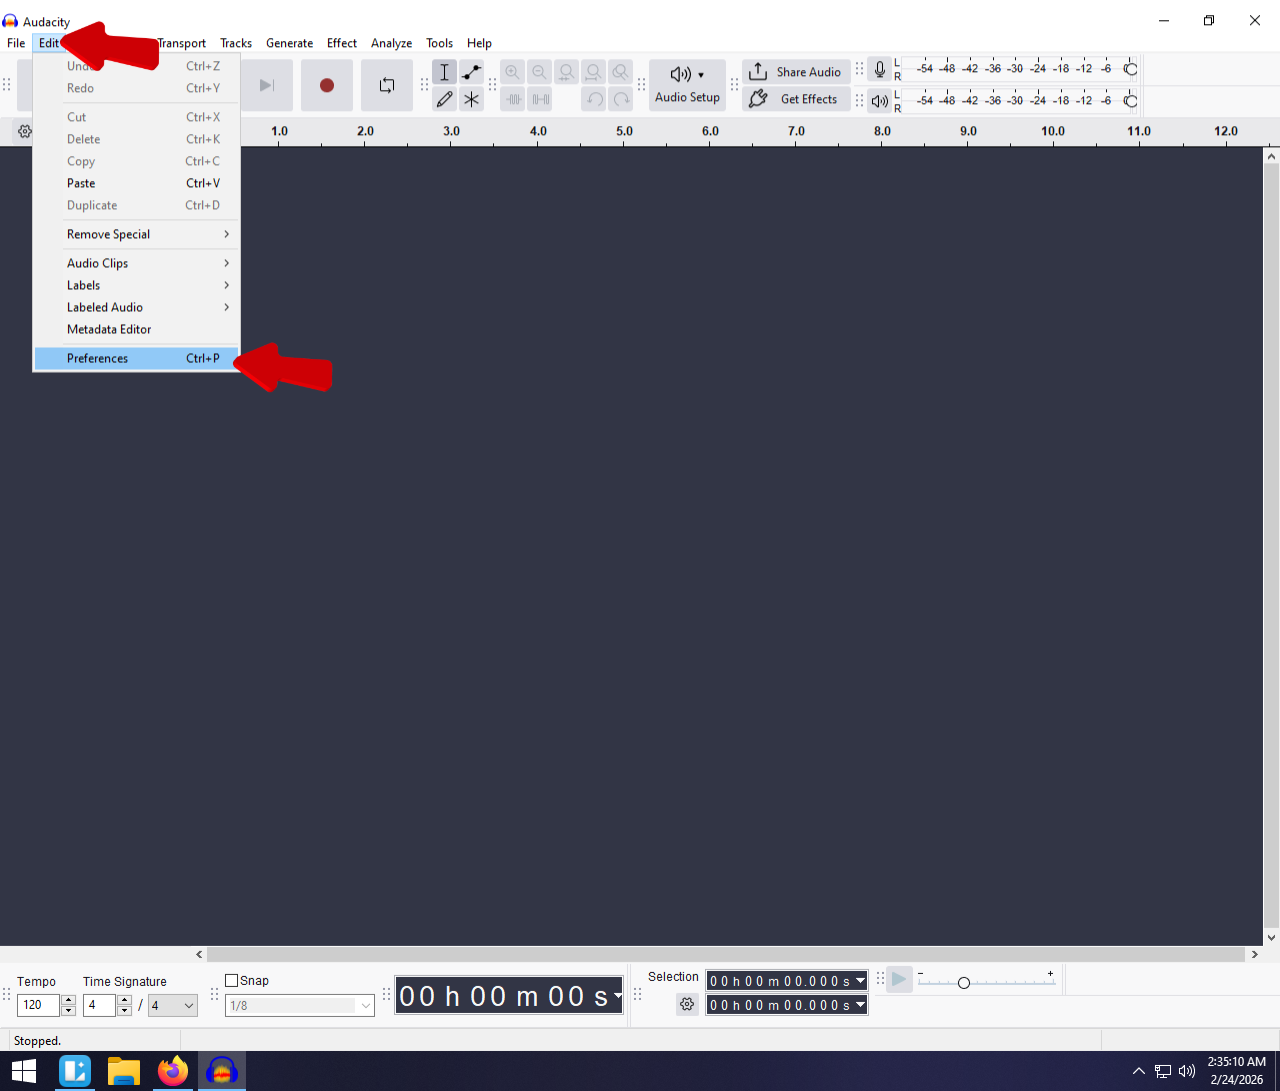
- Open Preferences:
- Windows: Go to Edit > Preferences (or press Ctrl + P).
- macOS: Go to Audacity > Settings (or press Cmd + ,).
- Navigate to Libraries: In the menu on the left side of the Preferences window, select Libraries.
- Initiate Download: Locate the section labeled “FFmpeg Import/Export Library” and click the Download button.

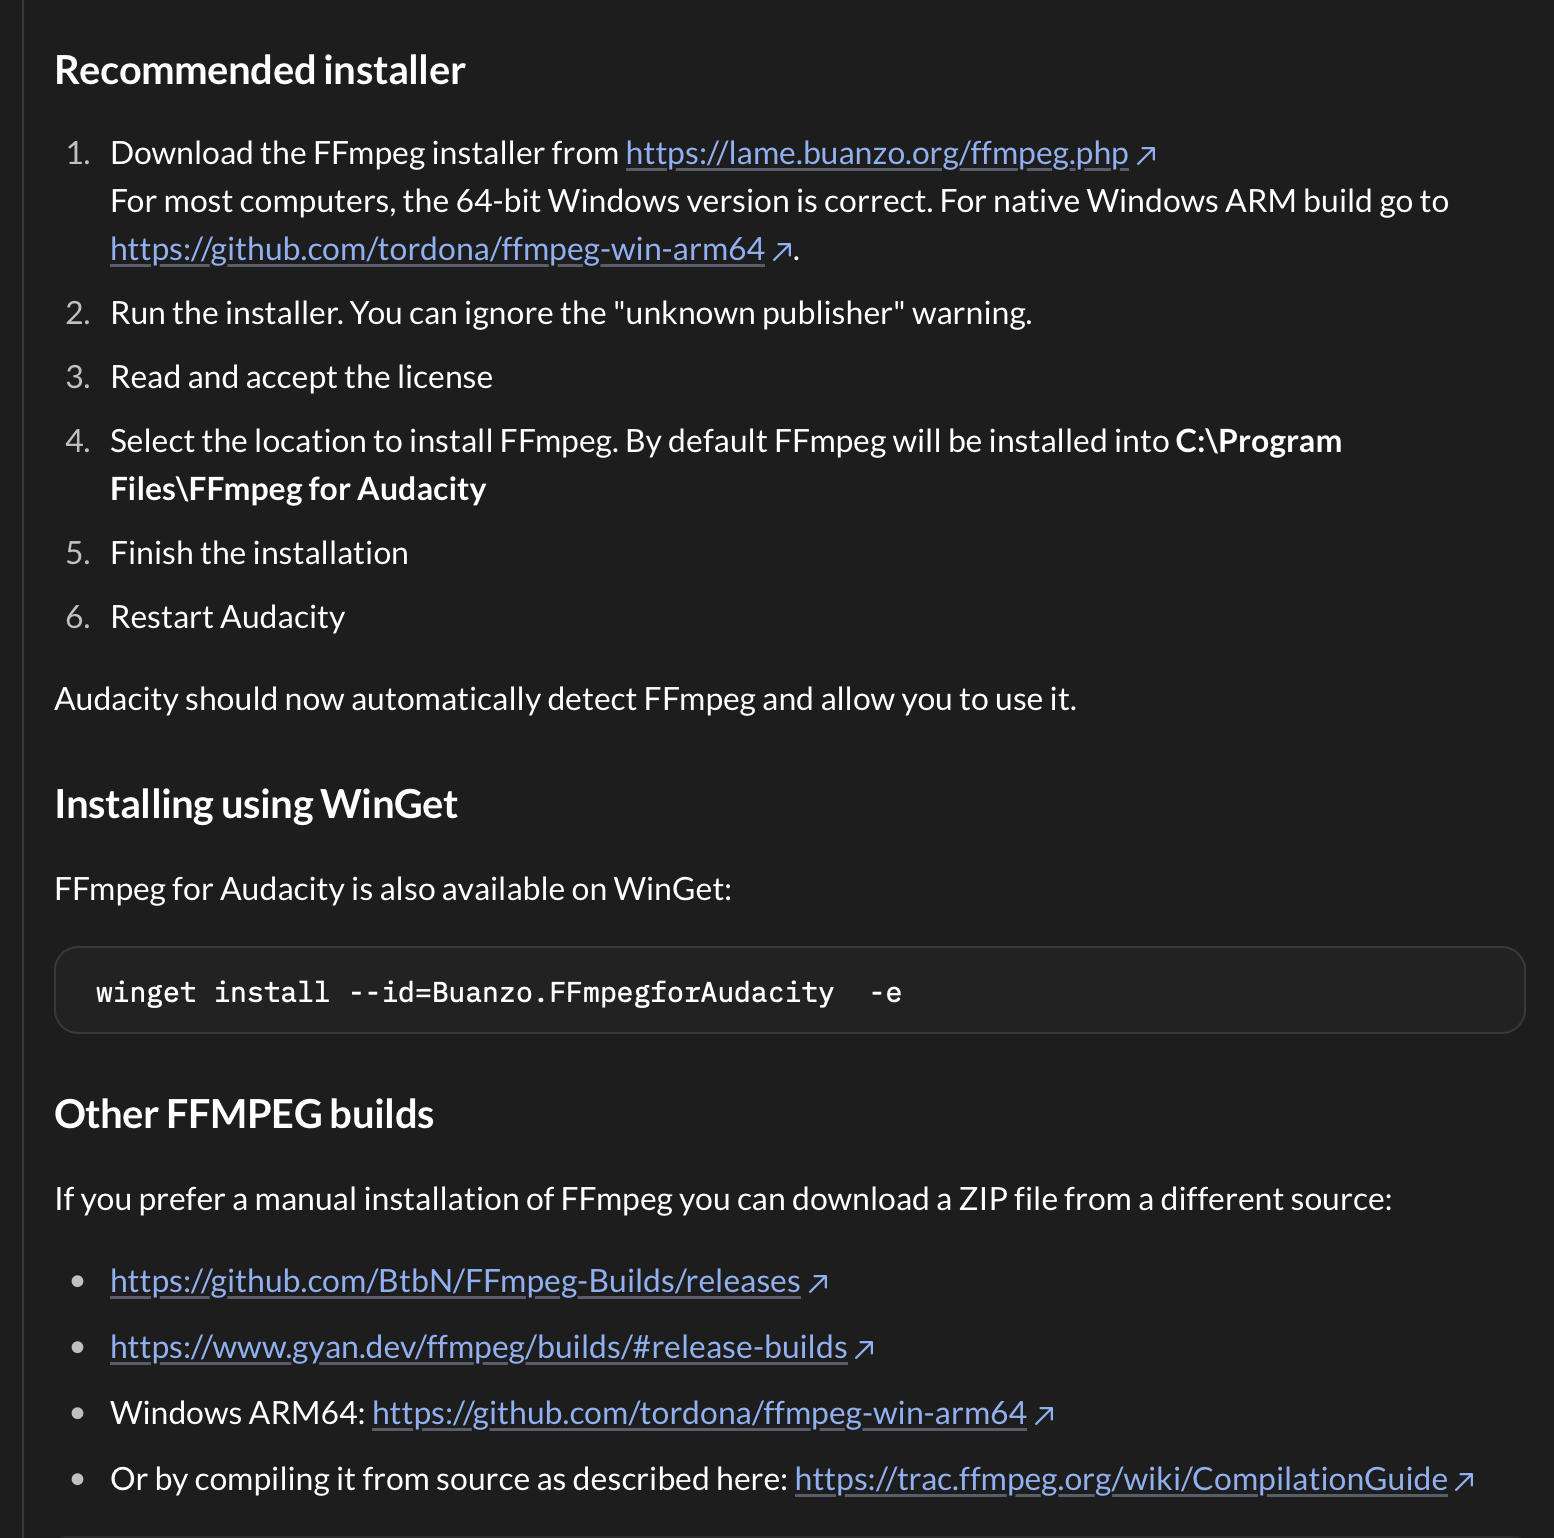
- Get the Installer: This will open the official Audacity support site in your web browser. Follow the links provided for your specific operating system – Windows, Mac, or Linux to download the installer file.

- Note: You will typically be directed to a GitHub release page. Download the installer (e.g., ffmpeg-win-2.2.2.exe or the .pkg file for Mac).

- Install the Library: Close Audacity completely. Run the installer you just downloaded and follow the on-screen prompts. The installer automatically places the files where Audacity looks for them.

- Restart and Import: Re-open Audacity. Drag and drop your AMR file into the timeline. You should now see the blue waveform appear immediately.

Troubleshooting: If Audacity still doesn’t recognize the file after installing, go back to Preferences > Libraries and click the Locate button to manually select the avformat file. However, the modern installer usually handles this for you.
Method 2: Convert AMR to WAV Before Importing (The Workaround)
If you can’t install the FFmpeg library—perhaps you are on a restricted work computer or just want a quick fix without modifying software—you can convert the file first.
Audacity natively supports WAV files without any plugins. By converting your AMR file to WAV using an external tool, you “clean” the format so Audacity can read it.
Note: Convert to WAV (Microsoft) 16-bit rather than MP3. Since AMR is already low-quality, converting it to MP3 (another compressed format) will make the audio sound worse. WAV preserves the original quality.
Option A: Use an Online Converter (Fastest)
This is the quickest method if you have internet access and the file isn’t confidential.
- Navigate to a reputable online converter like CloudConvert or Zamzar.

- Upload your .amr file.
- Set the output format to WAV.
- Click Convert and wait for the process to finish.

- Download the new file to your desktop and drag it into Audacity.
Option B: Use VLC Media Player (Offline)
If you have VLC Media Player installed, it has a built-in conversion tool that handles AMR files perfectly.
- Open VLC Media Player.
- Go to the top menu and select Media > Convert / Save (or press Ctrl + R).

- Click + Add and select your AMR file.


- Click the Convert / Save button at the bottom.

- In the “Profile” dropdown menu, select Audio – CD. This creates a standard WAV file.
- Click Browse to choose a destination for the new file and click Start.

Pro Tip: Stop Recording in AMR (Upgrade Your Audio Source)
Installing FFmpeg allows you to open these files, but you will quickly notice that editing them is difficult.
AMR is a narrowband format, typically recorded at a sample rate of only 8kHz. For context, standard CD quality is 44.1kHz. Because AMR was designed strictly to save data on old cellular networks, it aggressively cuts out high and low frequencies. This results in “telephone quality” audio that sounds muffled, thin, and robotic.
The hard truth: No amount of EQ or post-processing in Audacity can restore audio data that was never captured in the first place.
The Solution: Bypass the Internal Mic
The most effective way to fix “bad” audio is to stop it at the source. Instead of relying on your phone’s internal microphone—which often defaults to heavy compression and formats like AMR for voice memos—use a dedicated external microphone system like the Hollyland LARK M2 Series.

Hollyland LARK M2 - Mini Lavalier Microphone
An incredibly lightweight and compact wireless button microphone that captures high-fidelity audio.
Key Features: 9g Button Size | 48 kHz/24-bit | 40 Hours Battery
The LARK M2 is designed to bypass the limitations of mobile recording:
- Professional Specs: Unlike AMR’s 8kHz limit, the LARK M2 captures 48kHz/24-bit audio. This provides rich, broadcast-quality sound that is fully editable in Audacity without needing restoration plugins.
- Plug & Play: The receiver plugs directly into your smartphone via USB-C or Lightning, instantly overriding the internal mic.
- Invisible Form Factor: The microphone is coin-sized and weighs only 9 grams, making it perfect for discreet interviews or content creation.
By upgrading your input source, you skip the need for file conversions and ensure your raw audio is crisp the moment you hit record.
Editing Tips for AMR Files in Audacity
Once you have successfully imported your AMR file, the audio might sound “muddy.” While you can’t magically add missing frequencies, you can use these steps to make the speech clearer.
1. Resample the Audio
AMR files usually default to a Project Rate of 8,000 Hz. Before applying effects, upscale the project to a standard quality to prevent processing errors.
- Select your entire audio track (Ctrl + A or Cmd + A).
- Navigate to Tracks > Resample…

- Choose 44100 Hz from the dropdown menu and click OK.
- Ensure the Project Rate (Hz) located at the bottom-left of the Audacity window is also set to 44100.

2. Apply EQ to Fix “Muffled” Voices
Because AMR cuts off high frequencies, voices often lack presence. You can artificially boost the treble to make the speech easier to understand.
- Go to Effect > EQ and Filters > Filter Curve EQ.

- Click on Presets & Settings > Factory Presets > Treble Boost.

- This will raise the higher frequencies. If it sounds too harsh, manually drag the line down slightly around the 4kHz–5kHz range.

- Tip: Apply a High-Pass Filter (or “100Hz Rumble” preset) to cut out low-end mud and mechanical noise that doesn’t contain human speech.
3. Reduce Static and Hiss
Old phone recordings often contain background hiss. Audacity’s Noise Reduction tool is the standard fix here.
- Get the Profile: Highlight a small section of the audio that contains only silence (just the background hiss, no talking).
- Go to Effect > Noise Removal and Repair > Noise Reduction and click “Get Noise Profile.”

- Apply the Effect: Select the entire track. Go back to the Noise Reduction menu.
- Settings: Start with gentle settings to avoid making the voice sound robotic:
- Noise Reduction (dB): 6 to 12
- Sensitivity: 6.00
- Frequency Smoothing: 3

- Click OK. If the hiss remains, repeat the process gently rather than doing it all at once aggressively.
Frequently Asked Questions (FAQ)
Can I export back to AMR from Audacity?
Yes, but only if you have the FFmpeg library installed. Once active, “AMR (narrow band)” will appear as an option in the File > Export > Export Audio menu. However, unless you need the file for legacy hardware (like an old Nokia phone), avoid exporting to AMR. It degrades audio quality. Export as MP3 (for size) or WAV (for quality) instead.
Why does my AMR file sound muffled?
AMR files sound muffled because they are recorded in Narrowband. This format captures just enough frequency range to make human speech intelligible (telephone quality), but cuts out the “air” and clarity found in standard audio. It sounds like the speaker is talking through a thick blanket because the high-frequency data is literally missing.
Is FFmpeg safe to install?
Yes. FFmpeg is an open-source, industry-standard multimedia framework used by major software like VLC Media Player, YouTube, and HandBrake. It is not a virus or bloatware; it is simply a set of instructions that teaches Audacity how to “read” non-native file formats. Just ensure you download it through the links provided in the Audacity Preferences menu.
Conclusion
Getting Audacity to recognize AMR files might feel like a technical hurdle, but installing the FFmpeg library is a one-time fix. You haven’t just solved the immediate issue with your current file; you’ve also expanded Audacity’s ability to handle dozens of other formats like M4A and WMA. You can now drag and drop almost any audio file into your timeline without fear of error messages.
However, remember that being able to open an AMR file doesn’t change the fact that it is a low-quality format.
If you want to avoid these compatibility headaches and the muffled sound quality in the future, consider upgrading your recording gear. A dedicated system like the Hollyland LARK M2 Series bypasses your phone’s internal processing entirely, giving you professional 48kHz/24-bit audio that is ready to edit immediately.