.png)
Editing audio often feels like surgery. You need to slice, move, and separate sounds without “killing” the patient (your recording). Whether you are a podcaster trying to insert an ad break or a musician layering instruments, learning how to split tracks in Audacity is the most important workflow hack you can master.
This quick tutorial covers the difference between splitting and cutting, the fastest keyboard shortcuts, and how to handle the new “Clip Handle” mechanics in Audacity 3.0+.
Why Split Audio Tracks? (The Basics)
Before we get to the shortcuts, you need to know the difference between Splitting and Cutting, as beginners often confuse the two.
Cutting is destructive; it removes a section of audio and deletes it from the timeline. Splitting is non-destructive. Think of it like taking a pair of scissors to a film reel—you separate the audio into independent clips (regions) without deleting a single second of data.
You typically need to split tracks to:
- Create Space: Separate a continuous recording to insert an ad break, sound effect, or silence.
- Rearrange the Narrative: Move a specific answer in an interview to a different timestamp.
- Apply Specific Effects: Isolate a loud cough or noise spike to apply EQ or gain reduction to that specific section only.
Split Track vs. Split New
If you are confused by the options in the Edit menu, here is the breakdown:
- Split Track: Breaks the audio clip at the cursor point but keeps both pieces on the same track.
- Split New: Breaks the audio and immediately moves the selected portion to a brand-new track below. This is essential for layering sounds or overlaps.
Method 1: The Keyboard Shortcut (Fastest Way)
For 90% of your editing work, this is the only method you need. Using keyboard shortcuts allows you to make precise edits instantly without breaking your flow to hunt through menus.
Follow these steps to split your audio track in seconds:
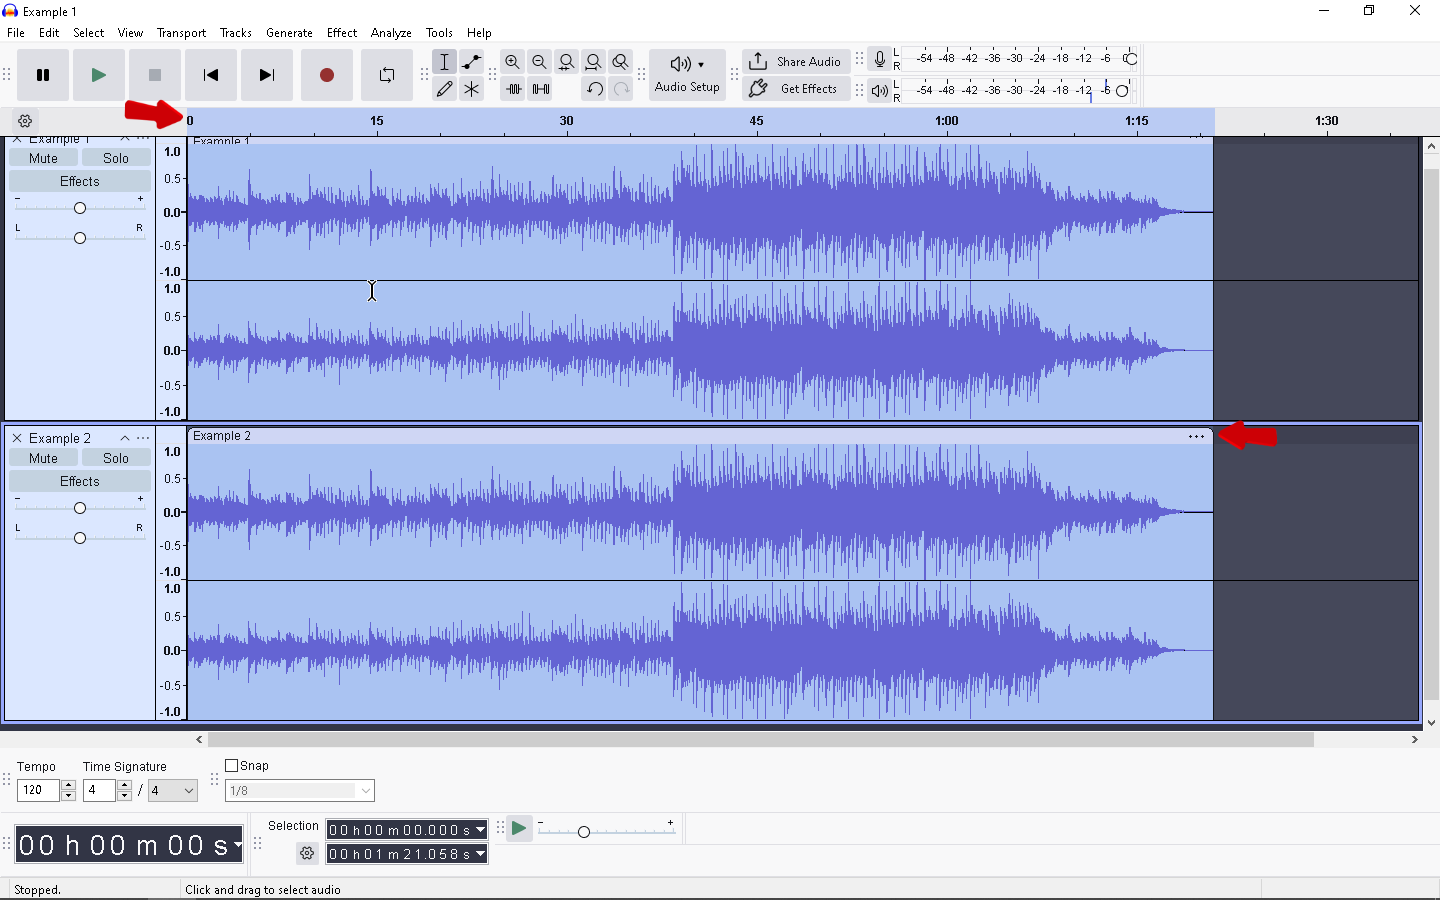
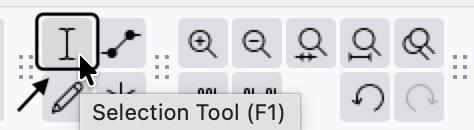
- Select the Selection Tool: Click the I-beam icon in the top toolbar (or simply press F1 on your keyboard).
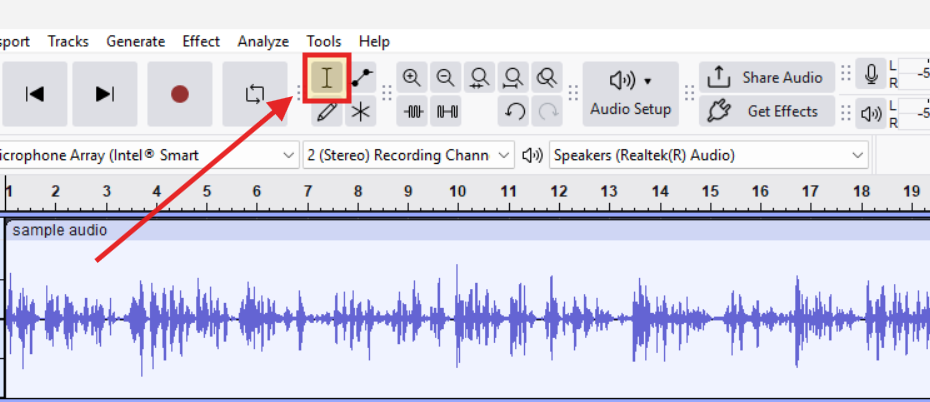
- Position the Cursor: Click the exact spot on the audio waveform where you want the split to happen. A thin vertical line will appear at that timestamp.
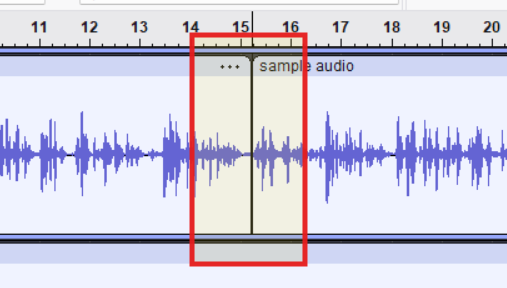
- Make the Split: Press Ctrl + I (Windows) or Cmd + I (Mac).
- Check Your Work: A bold, dark line (Split Boundary) will appear at your cursor position. This indicates the single audio clip has been separated into two distinct events that can now be moved or edited independently.
Method 2: How to “Split New” (Move to a New Track)
While standard splitting keeps your audio on the same timeline, Split New is a powerful tool for complex editing. This feature cuts the selected audio and immediately moves it to a brand-new track directly below the original.
This is useful for podcast editing or creating soundscapes where you need audio to overlap (like fading music out while a voice fades in). It also helps when you want to apply effects to just one specific phrase without altering the rest of the recording.
Step-by-Step Instructions
- Select the Audio: Using the Selection Tool (I-beam icon), click and drag to highlight the specific section of the waveform you want to isolate.
- Use the Shortcut:
- Windows: Press Ctrl + Alt + I (This shortcut is not available in latest Audacity versions. You can revert to the full set of shortcuts instead. Reference: https://manual.audacityteam.org/man/only_in_full_set.html)
- Mac: Press Cmd + Option + I
- Verify the Move: You will see the highlighted audio disappear from the original track and reappear on a new track below it.

Why use this? It keeps your original timeline clean while giving you granular control over specific segments.
Method 3: Using the Menu Bar (Mouse Method)
If you prefer visual navigation over keyboard shortcuts, or if you are still learning the interface, you can perform the exact same split function using Audacity’s main menu.
This method is slower than using hotkeys, but it ensures you don’t accidentally press the wrong key combination during a critical edit.
Follow these steps:
- Select the Selection Tool (I-beam icon) from the toolbar.
- Click on the waveform exactly where you want to make the cut.
- Navigate to Edit in the top menu bar.
- Hover over Audio Clips.
- Click Split.
Important Version Note:
If you are using a modern version of Audacity (3.0 or later), this function is located under Audio Clips. In older legacy versions, this same feature was hidden under a submenu labeled “Clip Boundaries.” If you do not see “Audio Clips,” we strongly recommend updating your software to access the current file structure and stability improvements.
How to Move Clips After Splitting (Important Update)
If you are a returning user updating to Audacity 3.0 or later, you might be frustrated to find that the Time Shift Tool (the double-ended arrow icon) has been removed.
In modern versions of Audacity, moving clips is now integrated directly into the Selection Tool, but it requires precise mouse placement.
The “Clip Handle” Rule
You can no longer simply click the middle of a waveform and drag it. Doing so will only highlight (select) the audio. To move a split segment, you must grab the Clip Handle.
The Clip Handle is the lighter-colored title bar located at the very top of the audio clip.
How to Drag and Drop Correctly
- Identify the Split: Ensure you have successfully split your track using Ctrl + I. You should see a vertical line separating the clips.
- Hover: Move your mouse cursor to the top edge of the clip (the Clip Handle).
- Watch the Cursor: Wait for your cursor to change from an “I-Beam” (text selector) to a Hand Icon.
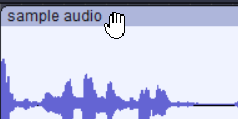
- Drag: Click and hold the left mouse button while the Hand icon is visible, then drag the clip left or right along the timeline.
Pro Tip: If you accidentally select audio instead of moving it, you are clicking too low on the waveform. Aim specifically for the top border where the clip name would usually appear.
Pro Tip: Reduce Editing Time with Better Source Audio
One of the most common reasons editors split tracks in Audacity isn’t for creative arrangement—it’s for damage control. If your guest laughed too loud or the microphone gain was set too high, you likely have clipping (flat-topped waveforms).
To fix this, editors often have to split the track around the distorted spike, isolate it, and manually apply gain reduction or repair effects. This process is tedious and disrupts your workflow.
The most effective way to speed up your editing is to capture audio that doesn’t require “surgical” splitting to fix.
The Solution: 32-Bit Float Recording
To avoid spending hours fixing distorted audio in post-production, consider upgrading to a microphone system that supports 32-bit Float Recording, such as the Hollyland LARK MAX 2.

Hollyland LARK MAX 2 - Premium Wireless Microphone System
A premium wireless microphone for videographers, podcasters, and content creators to capture broadcast-quality sound.
Key Features: Wireless Audio Monitoring | 32-bit Float | Timecode
Unlike traditional 16-bit or 24-bit recording, 32-bit Float captures an incredibly wide dynamic range. Here is why that matters for your Audacity workflow:
- Zero Distortion: If a speaker suddenly screams or laughs, the LARK MAX 2 captures the full data of that sound rather than “clipping” it. You don’t need to split the track to try and save the take; you simply lower the volume in Audacity, and the crystal-clear audio is still there.
- No Gain Anxiety: You don’t need to constantly monitor your levels while recording. The technology provides a massive safety net, drastically reducing the need to split and repair tracks manually.
Combined with Studio Quality 48kHz audio sampling, this hardware upgrade ensures your raw files enter Audacity sounding professional, allowing you to focus on the story rather than fixing technical errors.
Frequently Asked Questions (FAQ)
How do I join split tracks back together in Audacity?
If you split a clip by mistake or simply changed your mind, merging them is easy. The fastest method is to click the dark split line that separates the two clips; this will instantly merge them back into a single event. Alternatively, highlight the area across the split and navigate to Edit > Audio Clips > Join (or press Ctrl + J / Cmd + J).
What is the difference between “Split” and “Split New”?
While both functions separate your audio, the destination differs. Split (Ctrl + I) keeps both pieces on the same track. Use this to insert silence or shift a section on the same timeline. Split New (Ctrl + Alt + I) moves the selected audio to a new track below. Use this to layer sounds or apply specific effects to only that isolated section.
Why can’t I move my split track?
If you are using Audacity 3.0 or later, clicking the middle of the waveform no longer drags the clip. To move a split track, you must click and drag the Clip Handle—the title bar located at the very top of the audio clip. When your cursor hovers over this bar, it will change into a Hand icon, indicating you can drag the clip.
Does splitting a track lower audio quality?
No. Splitting a track in Audacity is a non-destructive process. It does not re-encode or compress your audio file. It simply tells the software to treat that section as a separate object for editing purposes. You can split a track hundreds of times without losing any fidelity.
Conclusion
Splitting tracks is the skill that moves you from simple recording to actual audio storytelling. Whether you are inserting a commercial break, creating silence, or rearranging an interview, mastering the Ctrl + I (Windows) or Cmd + I (Mac) shortcut is the fastest way to gain control over your timeline without destroying your original audio.
To improve your workflow further, practice using Split New (Ctrl + Alt + I) to move clips onto their own dedicated tracks. This layering technique is essential for complex podcasts where you need to adjust volume levels or apply effects to specific sections independently.
Finally, remember that the most efficient editing workflow starts with pristine source audio. If you find yourself constantly splitting tracks to isolate and remove background noise or fix distorted peaks, it may be time to upgrade your hardware. A microphone like the Hollyland LARK MAX 2 utilizes 32-bit Float Recording, which prevents audio clipping entirely, meaning you spend less time fixing errors and more time creating content.